Removing a fusible link in a Toyota Type A box requires careful steps, and at millertoyota.net, we’re dedicated to providing you with the information you need to tackle this task effectively, ensuring your Toyota runs smoothly. Our experts understand the nuances of Toyota electrical systems and can guide you through the process of electrical repairs. Consider this your ultimate guide to fusible link replacement, electrical component maintenance, and automotive fuse care.
1. What Is a Fusible Link and Why Remove It in a Toyota Type A Box?
A fusible link is a type of overcurrent protection device used in automotive electrical systems, including those of Toyota vehicles. It’s essentially a heavy-duty fuse designed to protect critical circuits from damage due to excessive current flow.
Here’s a more detailed explanation:
- Overcurrent Protection: Fusible links are designed to protect the vehicle’s electrical system from damage caused by short circuits or overloads. When the current exceeds a specified level, the fusible link melts, interrupting the circuit and preventing further damage.
- Critical Circuits: These links typically protect circuits that supply power to essential components, such as the engine control unit (ECU), fuel pump, and other vital systems.
- Toyota Type A Box: The Type A box refers to a specific type of fuse box used in various Toyota models. Knowing the box type helps in identifying the correct fusible link and replacement procedure.
Removing a fusible link might be necessary for several reasons:
- Blown Fusible Link: The most common reason is that the fusible link has blown due to an electrical fault, such as a short circuit. This can cause a loss of power to critical systems.
- Testing Purposes: During troubleshooting, you might need to remove the fusible link to isolate a particular circuit and test its functionality.
- Replacement: If the fusible link is old or damaged, it should be replaced to ensure reliable protection of the electrical system.
- Modification: In some cases, modifying the electrical system might require removing or replacing the fusible link with one of a different rating.
Understanding the function of a fusible link and the reasons for its removal is the first step in performing this task correctly. At millertoyota.net, you’ll find detailed resources and expert advice to help you diagnose electrical issues and maintain your Toyota’s electrical system. This includes troubleshooting electrical problems, electrical system maintenance, and car fuse replacement guidance.
2. What Tools and Materials Are Needed to Remove a Fusible Link?
Before you start removing the fusible link in your Toyota Type A box, make sure you have the right tools and materials on hand. This will make the process smoother and safer.
- Socket Set: A set of sockets and ratchets in both metric and standard sizes will be essential for removing bolts and nuts.
- Wrench Set: Wrenches are needed for various fasteners, and having a set ensures you have the right size.
- Screwdrivers: Both flat-head and Phillips-head screwdrivers are necessary for removing screws and clips.
- Pliers: Pliers are useful for gripping and manipulating small parts, as well as disconnecting electrical connectors.
- Multimeter: A multimeter is crucial for testing electrical circuits and ensuring there is no voltage present before you start working.
- Test Light: A test light can also be used to check for voltage in circuits.
- Wire Strippers/Crimpers: If you need to replace the fusible link or make any wiring repairs, wire strippers and crimpers are essential.
- New Fusible Link: Make sure you have the correct replacement fusible link for your Toyota model and the specific circuit it protects.
- Gloves: Wearing gloves will protect your hands from dirt, grease, and sharp edges.
- Safety Glasses: Safety glasses are essential to protect your eyes from debris and potential splashes.
- Shop Rags: Keep shop rags handy for cleaning up any spills or wiping dirt and grease.
- Pen and Paper: It’s a good idea to take notes and draw diagrams as you disassemble parts to help with reassembly.
- Work Light: A good work light will provide ample illumination, especially when working in dimly lit areas.
Having these tools and materials ready will ensure that you can safely and effectively remove and replace the fusible link in your Toyota Type A box. Always prioritize safety and take your time to avoid mistakes. At millertoyota.net, we emphasize the importance of using the correct tools and following safety procedures to maintain your Toyota’s reliability. This includes using the appropriate fuse box tools, automotive electrical tools, and car wiring repair tools.
3. What Are the Safety Precautions Before Removing a Fusible Link?
Before you even think about touching any part of your Toyota’s electrical system, safety should be your number one priority. Here’s a breakdown of the precautions you should take:
- Disconnect the Battery: Always disconnect the negative terminal of the battery before working on any electrical components. This prevents accidental short circuits and electrical shocks. Use a wrench to loosen the nut on the negative terminal, then carefully remove the cable. Secure the cable away from the terminal to ensure it doesn’t accidentally reconnect.
- Read the Manual: Consult your Toyota’s service manual for specific instructions and diagrams related to the fusible link and fuse box. This will provide valuable information about the location, type, and removal procedure for the fusible link.
- Wear Safety Gear: Protect yourself by wearing safety glasses and gloves. Safety glasses will shield your eyes from debris, while gloves will protect your hands from dirt, grease, and sharp edges.
- Use Insulated Tools: When working with electrical components, use tools with insulated handles to prevent electric shock.
- Work in a Well-Ventilated Area: If you’re working with any chemicals or cleaning agents, make sure to do so in a well-ventilated area to avoid inhaling harmful fumes.
- Avoid Water: Never work on electrical components in wet or damp conditions. Water can conduct electricity and increase the risk of electric shock.
- Double-Check: Before you start, double-check that you have disconnected the battery and that you have all the necessary tools and materials.
- Take Your Time: Rushing can lead to mistakes and potential injuries. Work carefully and methodically, and don’t hesitate to take breaks if you need them.
- Know Your Limits: If you’re not comfortable working on electrical systems, it’s best to seek the help of a qualified mechanic. Electrical systems can be complex, and mistakes can be costly or even dangerous.
- Ground Yourself: Static electricity can damage sensitive electronic components. Ground yourself by touching a metal part of the car before working on any electrical components.
By following these safety precautions, you can minimize the risk of accidents and injuries while working on your Toyota’s electrical system. At millertoyota.net, we are committed to promoting safe automotive maintenance practices to protect both you and your vehicle. These practices include essential electrical safety tips, safe auto repair practices, and car maintenance safety guidelines.
 Electrical wiring Electronics Technology Auto part Vehicle
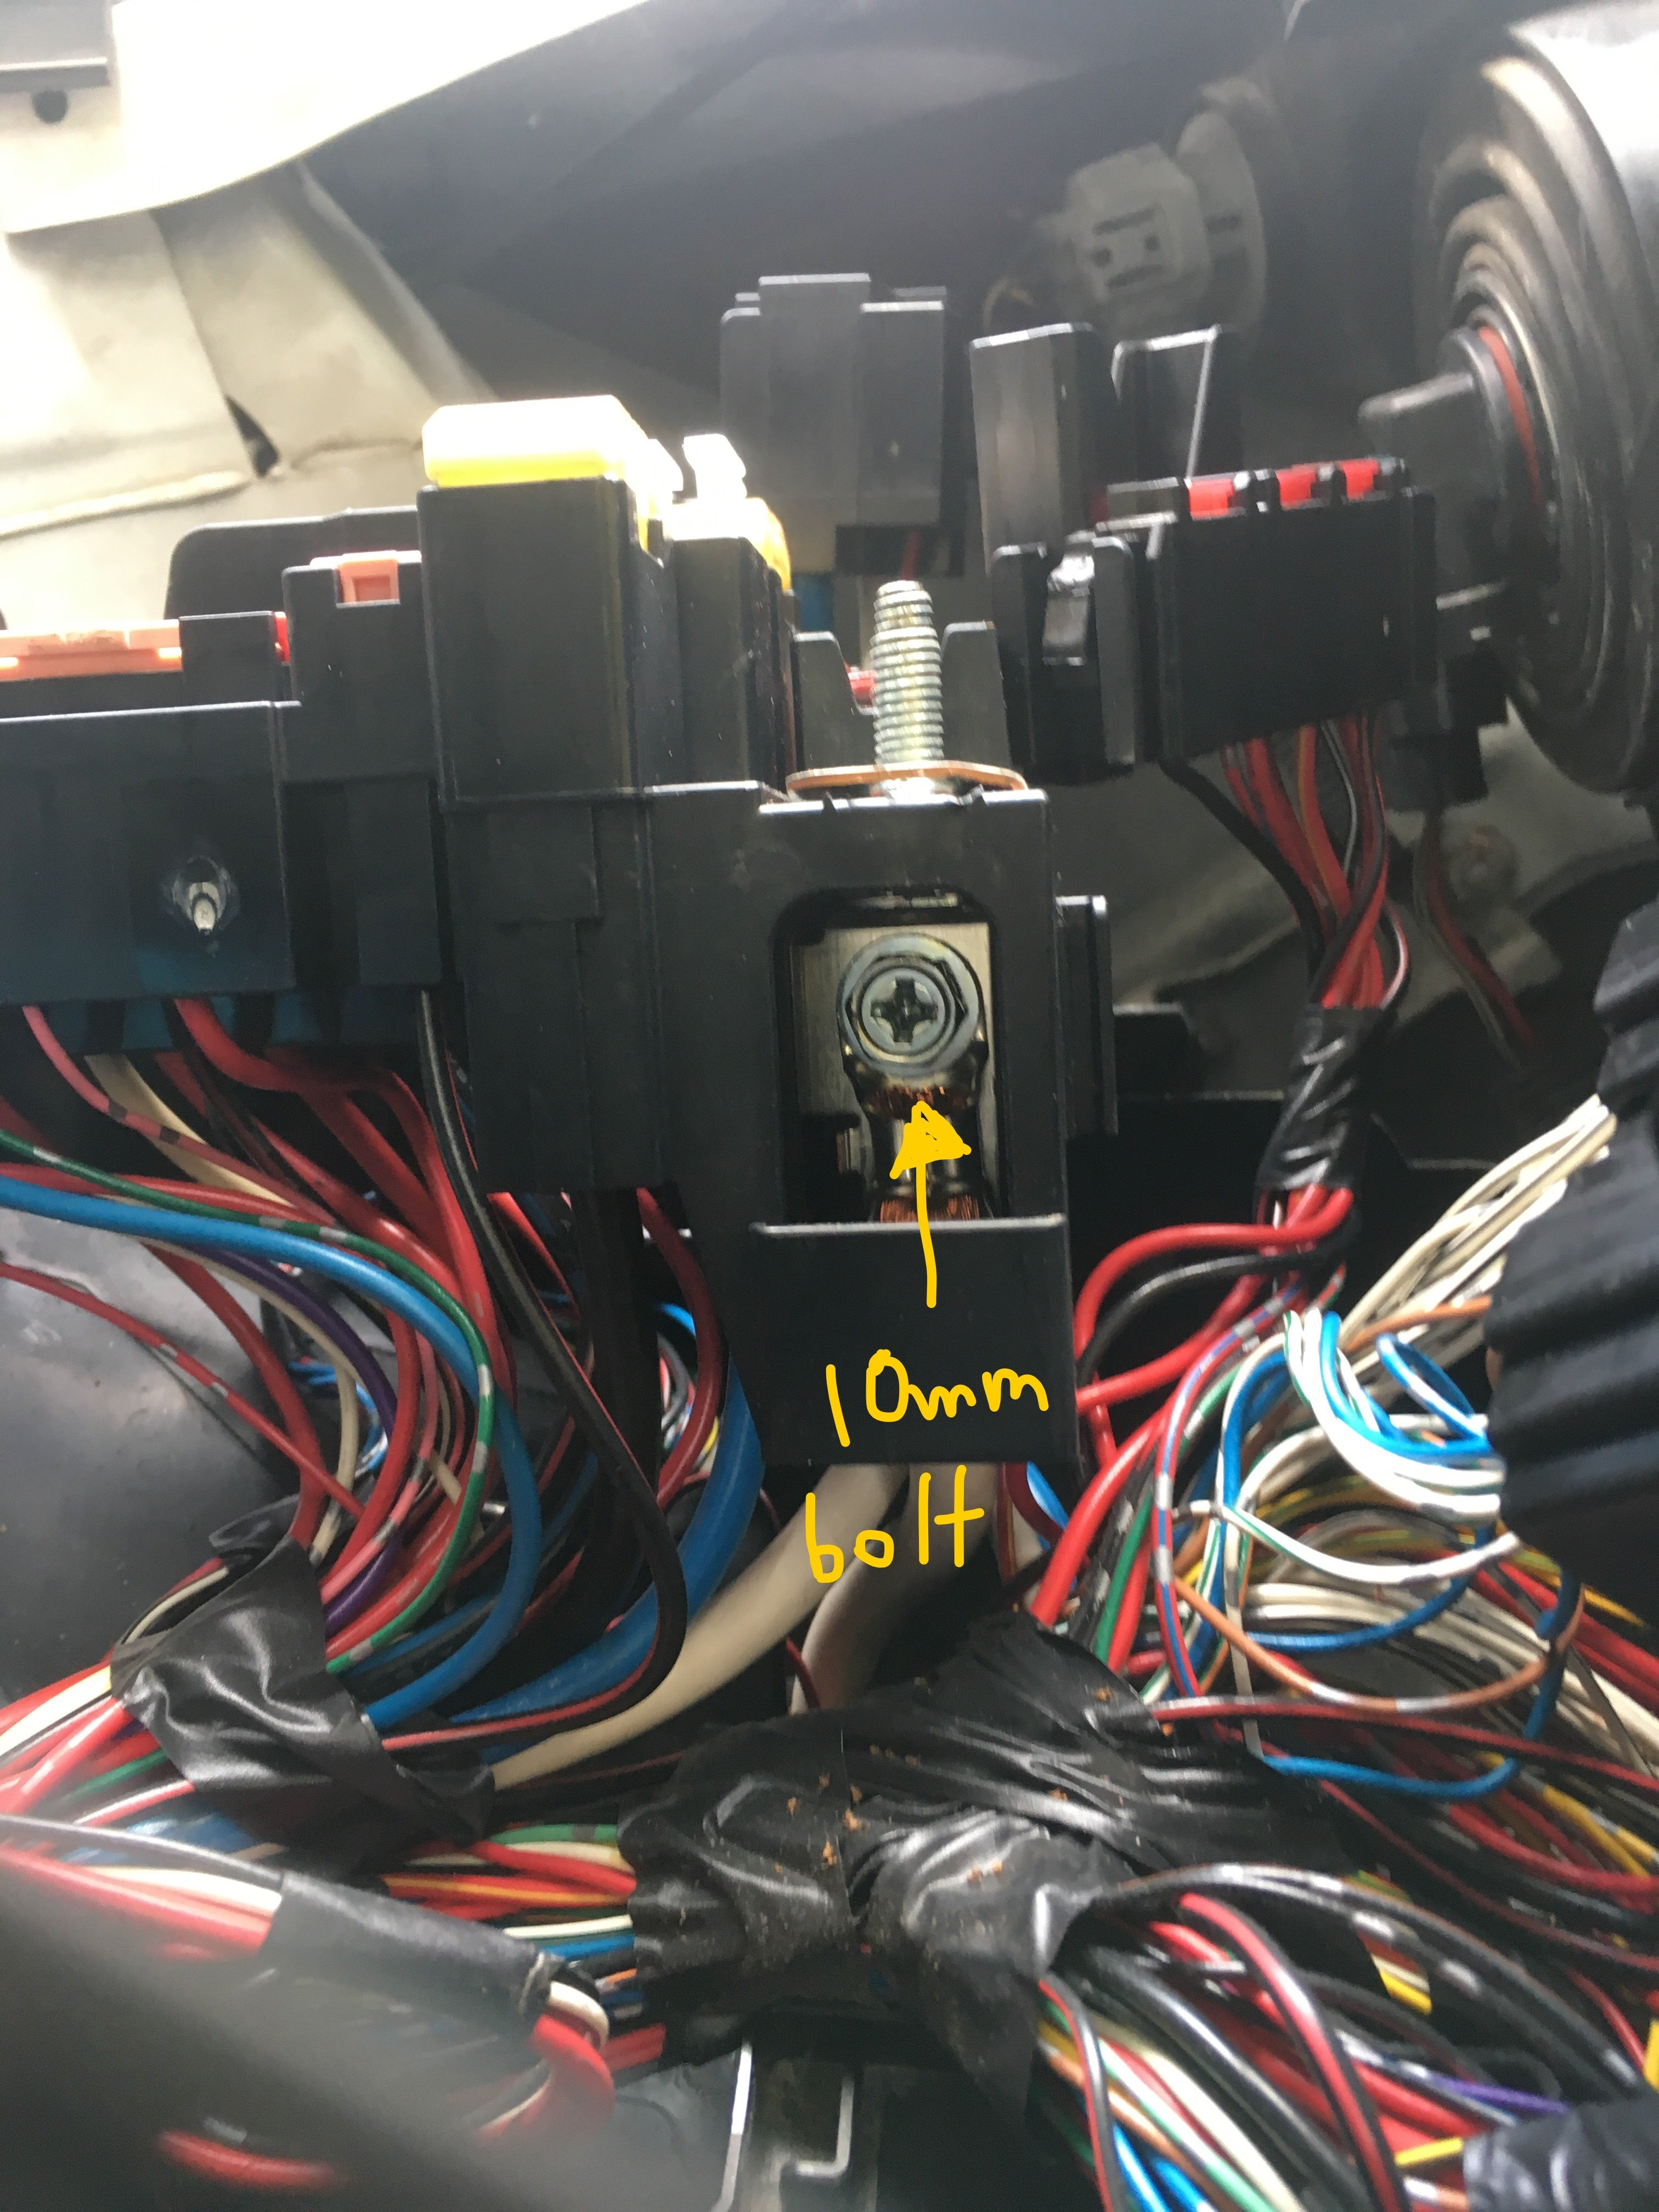
4. How to Locate the Fusible Link in a Toyota Type A Box
Finding the fusible link in your Toyota’s Type A box is a crucial step in the removal process. Here’s a detailed guide to help you locate it:
- Consult the Owner’s Manual: Your Toyota owner’s manual is your best friend in this situation. It contains detailed diagrams and descriptions of the fuse box locations and the specific fuses and fusible links they house. Look for the section on fuses and electrical components.
- Identify the Fuse Box: Toyota vehicles typically have multiple fuse boxes, often located in the engine compartment and under the dashboard. The Type A box is usually in the engine compartment, near the battery. Check your owner’s manual for the exact location.
- Open the Fuse Box: Once you’ve located the fuse box, open it by releasing the clips or latches that hold the cover in place.
- Read the Fuse Box Diagram: The inside of the fuse box cover usually has a diagram that labels each fuse and fusible link. This diagram is essential for identifying the correct fusible link.
- Look for the High-Amp Fuses: Fusible links are typically larger than standard fuses and have higher amperage ratings. They are often enclosed in a plastic housing and connected to the circuit with bolts or screws.
- Check the Labeling: The fusible link should be labeled with its amperage rating and the circuit it protects. This information is crucial for selecting the correct replacement.
- Use a Test Light or Multimeter: If you’re unsure which fusible link is the correct one, you can use a test light or multimeter to check for continuity. With the battery disconnected, probe the terminals of each fusible link to see if there is a complete circuit. The blown fusible link will show no continuity.
- Take Pictures: Before you start removing anything, take pictures of the fuse box and the fusible link. This will help you remember the correct placement and orientation when you reassemble everything.
- Online Resources: If you don’t have your owner’s manual, you can often find fuse box diagrams online. Search for your specific Toyota model and year to find the correct diagram.
- Consult a Professional: If you’re still having trouble locating the fusible link, don’t hesitate to consult a qualified mechanic. They can quickly identify the correct fusible link and ensure that it is removed and replaced correctly.
By following these steps, you should be able to locate the fusible link in your Toyota Type A box and prepare for its removal. At millertoyota.net, we provide resources and expert advice to help you navigate your Toyota’s electrical system with confidence. This includes help with fuse box identification, car fuse location assistance, and automotive wiring diagrams.
5. Step-by-Step Guide to Removing the Fusible Link
Now that you’ve located the fusible link and taken all the necessary safety precautions, here’s a step-by-step guide to removing it:
- Gather Your Tools: Make sure you have all the necessary tools within reach, including a socket set, wrench set, screwdrivers, and pliers.
- Disconnect the Battery: If you haven’t already done so, disconnect the negative terminal of the battery.
- Remove the Fuse Box Cover: Open the fuse box by releasing the clips or latches that hold the cover in place.
- Identify the Fusible Link: Use the fuse box diagram to identify the correct fusible link.
- Remove Any Surrounding Components: Depending on the location of the fusible link, you may need to remove surrounding components, such as relays or other fuses, to gain access.
- Loosen the Fasteners: Use the appropriate socket or wrench to loosen the bolts or screws that secure the fusible link to the fuse box. Be careful not to overtighten or strip the fasteners.
- Remove the Fusible Link: Once the fasteners are loose, carefully lift the fusible link out of the fuse box. If it’s stuck, gently wiggle it back and forth until it comes loose.
- Inspect the Fusible Link: Examine the fusible link for any signs of damage, such as cracks or melted areas. This can help you determine the cause of the electrical fault.
- Clean the Terminals: Use a wire brush or terminal cleaner to clean the terminals in the fuse box where the fusible link was connected. This will ensure a good electrical connection when you install the new fusible link.
- Install the New Fusible Link: Place the new fusible link into the fuse box, making sure it is properly aligned.
- Tighten the Fasteners: Use the appropriate socket or wrench to tighten the bolts or screws that secure the fusible link. Be careful not to overtighten.
- Reinstall Any Surrounding Components: If you removed any surrounding components, reinstall them in their original positions.
- Replace the Fuse Box Cover: Close the fuse box and secure the cover with the clips or latches.
- Reconnect the Battery: Reconnect the negative terminal of the battery.
- Test the Circuit: Turn on the ignition and test the circuit that the fusible link protects to make sure it is working properly.
- Verify Repairs: Confirm the vehicle is operating as expected.
- Proper Disposal: Dispose of the old fusible link properly.
By following these steps carefully, you can safely and effectively remove and replace the fusible link in your Toyota Type A box. At millertoyota.net, we provide detailed guides and expert advice to help you maintain your Toyota’s electrical system and keep it running smoothly. This includes specific instruction on fusible link replacement steps, fuse box maintenance tips, and car electrical repair procedures.
6. Common Mistakes to Avoid When Removing a Fusible Link
Removing a fusible link might seem straightforward, but there are several common mistakes that DIYers make. Avoiding these errors can save you time, money, and potential headaches.
- Forgetting to Disconnect the Battery: This is the most critical safety precaution. Failing to disconnect the battery can result in electrical shock or damage to the vehicle’s electrical system.
- Using the Wrong Tools: Using the wrong size socket or wrench can strip the fasteners or damage the fuse box. Always use the correct tools for the job.
- Overtightening Fasteners: Overtightening the bolts or screws that secure the fusible link can damage the fuse box or strip the threads. Tighten them snugly, but not excessively.
- Forcing the Fusible Link: If the fusible link is stuck, don’t force it. Gently wiggle it back and forth until it comes loose. Forcing it can damage the fuse box.
- Not Cleaning the Terminals: Dirty or corroded terminals can impede the flow of electricity. Always clean the terminals before installing the new fusible link.
- Installing the Wrong Fusible Link: Using the wrong amperage rating or type of fusible link can damage the circuit or cause a fire. Always use the correct replacement.
- Ignoring the Fuse Box Diagram: The fuse box diagram is essential for identifying the correct fusible link. Ignoring it can lead to mistakes and damage.
- Not Taking Pictures: Taking pictures of the fuse box before you start disassembling it can help you remember the correct placement and orientation of the components when you reassemble everything.
- Rushing the Job: Rushing can lead to mistakes and potential injuries. Take your time and work carefully and methodically.
- Neglecting Safety Gear: Always wear safety glasses and gloves to protect yourself from debris, sharp edges, and potential electrical hazards.
- Improper Disposal: Always dispose of old electrical components according to local regulations.
By being aware of these common mistakes and taking steps to avoid them, you can safely and effectively remove and replace the fusible link in your Toyota Type A box. At millertoyota.net, we are committed to providing you with the information and resources you need to perform automotive maintenance tasks correctly and safely. This includes highlighting common car repair mistakes, providing automotive safety advice, and offering tips for avoiding electrical system errors.
7. How to Test the Circuit After Replacing the Fusible Link
After you’ve replaced the fusible link, it’s essential to test the circuit to ensure that everything is working properly. Here’s how to do it:
- Reconnect the Battery: Reconnect the negative terminal of the battery.
- Turn on the Ignition: Turn the ignition key to the “on” position, but don’t start the engine.
- Check the Affected Components: Check the components that are powered by the circuit that the fusible link protects. This might include lights, accessories, or engine components.
- Use a Multimeter: Use a multimeter to check for voltage at the components. Set the multimeter to the voltage setting and probe the terminals of the component. You should see a voltage reading that is close to the battery voltage (around 12 volts).
- Check for Continuity: If the component is not working, check for continuity in the circuit. Disconnect the battery and set the multimeter to the continuity setting. Probe the terminals of the component and the ground. You should hear a beep or see a reading on the multimeter, indicating that there is a complete circuit.
- Test the Fuses: Check the fuses in the circuit to make sure they are not blown. Use a test light or multimeter to check for continuity across the fuse terminals.
- Inspect the Wiring: Inspect the wiring in the circuit for any signs of damage, such as cuts, abrasions, or melted insulation. Repair or replace any damaged wiring.
- Check the Ground Connections: Make sure the ground connections in the circuit are clean and tight. Loose or corroded ground connections can cause voltage drops and affect the performance of the components.
- Consult the Wiring Diagram: Refer to the wiring diagram for the circuit to help you identify the components and wiring involved. This can be helpful in troubleshooting any problems.
- Seek Professional Help: If you’re not comfortable testing the circuit yourself, or if you’re unable to identify the problem, seek the help of a qualified mechanic. Electrical problems can be complex, and it’s best to leave them to the professionals.
By following these steps, you can effectively test the circuit after replacing the fusible link and ensure that everything is working properly. At millertoyota.net, we provide detailed information and expert advice to help you diagnose and repair electrical problems in your Toyota. This includes guidance on car electrical testing procedures, automotive circuit troubleshooting, and multimeter usage in car repair.
8. Understanding Different Types of Fusible Links for Toyotas
Knowing the different types of fusible links is critical when replacing one in your Toyota. Using the wrong type can lead to electrical issues or even damage your vehicle. Here’s a breakdown of the common types:
- Standard Fusible Links: These are the most common type and consist of a wire encased in a non-flammable material. They are designed to melt and break the circuit when the current exceeds a certain level.
- Cartridge Fusible Links: These are enclosed in a cylindrical cartridge and are typically used for higher amperage circuits. They are more robust than standard fusible links and can handle larger current surges.
- Blade-Type Fusible Links: These have a blade-like design and are plugged into a fuse box or connector. They are easy to replace and are often used for lower amperage circuits.
- Slow-Blow Fusible Links: These are designed to withstand temporary current surges without blowing. They are used in circuits that experience frequent surges, such as those with electric motors.
- Fast-Acting Fusible Links: These blow quickly when the current exceeds the rated level. They are used in circuits that require fast protection, such as those with sensitive electronic components.
When selecting a replacement fusible link for your Toyota, it’s important to consider the following factors:
- Amperage Rating: The amperage rating of the fusible link should match the original. Using a higher amperage rating can damage the circuit, while using a lower rating can cause the fusible link to blow prematurely.
- Type: The type of fusible link should match the original. Using the wrong type can affect the performance and protection of the circuit.
- Size: The size of the fusible link should match the original. Using a different size can make it difficult to install and may not provide a proper connection.
- Brand: It’s best to use a fusible link from a reputable brand. This will ensure that the fusible link is of high quality and will provide reliable protection.
Consult your Toyota’s service manual or a qualified mechanic to determine the correct type and amperage rating for your vehicle. At millertoyota.net, we offer expert advice and resources to help you choose the right fusible links and other electrical components for your Toyota. This includes information on automotive fuse types, car electrical component selection, and Toyota-specific fuse guides.
9. What Causes a Fusible Link to Blow in a Toyota?
Understanding why a fusible link blows in your Toyota can help you prevent future issues. Here are some of the most common causes:
- Short Circuit: A short circuit occurs when a wire comes into contact with ground, creating a path of low resistance. This causes a large amount of current to flow through the circuit, which can blow the fusible link.
- Overload: An overload occurs when the circuit is drawing more current than it is designed to handle. This can happen if you add too many accessories to the circuit or if a component is malfunctioning and drawing excessive current.
- Faulty Component: A faulty component, such as a failing alternator or starter motor, can draw excessive current and cause the fusible link to blow.
- Wiring Problems: Damaged or corroded wiring can cause a short circuit or increase the resistance in the circuit, leading to an overload.
- Moisture: Moisture can cause corrosion and short circuits in the electrical system, which can blow the fusible link.
- Age: Over time, fusible links can weaken and become more susceptible to blowing.
- Improper Installation: If a fusible link is not installed properly, it may not make a good connection, which can cause it to overheat and blow.
To prevent fusible links from blowing, you can take the following steps:
- Inspect Wiring: Regularly inspect the wiring in your Toyota for any signs of damage or corrosion. Repair or replace any damaged wiring.
- Avoid Overloads: Avoid adding too many accessories to a single circuit. If you need to add more accessories, consider installing a separate circuit with its own fusible link.
- Maintain Components: Properly maintain the components in your Toyota’s electrical system, such as the alternator, starter motor, and battery.
- Keep it Dry: Keep the electrical system dry and free from moisture.
- Use the Correct Fusible Links: Always use the correct type and amperage rating of fusible link for your Toyota.
- Professional Installation: Have a qualified mechanic install any new electrical components or wiring in your Toyota.
By understanding the causes of blown fusible links and taking preventive measures, you can keep your Toyota’s electrical system running smoothly and reliably. At millertoyota.net, we provide expert advice and resources to help you maintain your Toyota’s electrical system and prevent costly repairs. This includes guidance on car electrical system maintenance, preventing blown fuses, and troubleshooting car wiring issues.
10. When to Consult a Professional Mechanic
While many Toyota owners are comfortable performing basic maintenance tasks, there are certain situations where it’s best to consult a professional mechanic. Here are some scenarios where you should seek professional help when dealing with a fusible link issue:
- Uncertainty: If you’re not comfortable working on electrical systems or you’re unsure about any step in the removal or replacement process, it’s best to seek professional help.
- Recurring Issues: If the fusible link continues to blow after you’ve replaced it, there may be a more serious underlying problem in the electrical system. A professional mechanic can diagnose the root cause of the problem and make the necessary repairs.
- Complex Electrical Problems: Electrical systems can be complex, and troubleshooting them requires specialized knowledge and equipment. If you’re facing a complex electrical problem, it’s best to leave it to the professionals.
- Lack of Tools: If you don’t have the necessary tools to perform the job safely and effectively, it’s best to consult a professional mechanic.
- Warranty Concerns: If your Toyota is still under warranty, having a professional mechanic perform the repairs can help ensure that the warranty remains valid.
- Safety Concerns: If you’re concerned about your safety or the safety of your vehicle, it’s always best to err on the side of caution and consult a professional mechanic.
When choosing a mechanic, look for one who is experienced in working on Toyota vehicles and has a good reputation. You can ask for recommendations from friends, family, or online review sites.
At millertoyota.net, we have a team of experienced and qualified mechanics who can diagnose and repair any electrical problem in your Toyota. We use the latest diagnostic equipment and techniques to ensure that your vehicle is repaired correctly and efficiently. Contact us today to schedule an appointment. This includes expert car electrical diagnostics, qualified Toyota mechanics, and reliable automotive repair services.
11. How to Prevent Future Fusible Link Problems in Your Toyota
Preventing fusible link problems in your Toyota involves regular maintenance and a proactive approach to your vehicle’s electrical system. Here are some tips to help you avoid future issues:
- Regular Inspections: Make it a habit to regularly inspect your Toyota’s electrical system. Look for any signs of damage, corrosion, or loose connections. Pay close attention to the wiring, connectors, and terminals.
- Proper Maintenance: Follow the recommended maintenance schedule for your Toyota, including regular oil changes, tune-ups, and battery checks. A well-maintained vehicle is less likely to experience electrical problems.
- Avoid Overloading Circuits: Be mindful of the number of accessories you add to a single circuit. Overloading a circuit can cause the fusible link to blow and potentially damage the electrical system.
- Use Quality Components: When replacing electrical components, such as fuses, fusible links, and relays, use high-quality parts from reputable brands. Cheap or substandard parts may not provide the same level of protection and reliability.
- Keep the Electrical System Dry: Moisture can cause corrosion and short circuits in the electrical system. Keep the engine compartment and interior of your Toyota dry, and avoid driving through deep water if possible.
- Protect Wiring: Protect the wiring in your Toyota from damage. Use wire looms or conduit to protect exposed wires, and avoid running wires where they can be pinched or chafed.
- Secure Connections: Ensure that all electrical connections are clean and tight. Loose connections can cause voltage drops and overheating, which can damage components and blow fusible links.
- Monitor Battery Health: The battery is the heart of your Toyota’s electrical system. Have the battery tested regularly to ensure that it is in good condition and properly charged.
- Professional Checkups: Schedule regular checkups with a qualified mechanic to have the electrical system inspected. A professional can identify potential problems before they become major issues.
- Consult the Owner’s Manual: Refer to your Toyota’s owner’s manual for specific information about the electrical system and maintenance recommendations.
By following these tips, you can help prevent future fusible link problems in your Toyota and keep its electrical system running smoothly for years to come. At millertoyota.net, we are committed to providing you with the information and resources you need to maintain your Toyota and keep it in top condition. This includes advice on proactive car maintenance, electrical system care tips, and Toyota maintenance schedules.
12. Understanding Toyota Type A Box Variations Across Models
Toyota’s Type A fuse box isn’t a one-size-fits-all component; it can vary in layout and function across different models and years. Understanding these variations is crucial for accurate fusible link removal and replacement. Here’s what to consider:
- Model-Specific Layout: The arrangement of fuses, relays, and fusible links within the Type A box can differ significantly between Toyota models. A Camry’s Type A box might look quite different from a Tacoma’s, even if they are from the same year.
- Year-to-Year Changes: Even within the same model, the Type A box can undergo changes from year to year. Toyota may revise the design, add new features, or relocate components, impacting the location of the fusible link.
- Engine Variations: The engine type can also influence the Type A box configuration. A hybrid model might have additional electrical components and a different fuse arrangement compared to a gasoline-only version.
- Trim Levels: Higher trim levels with more features often have more complex electrical systems, which can result in a more populated Type A box with additional fuses and fusible links.
- Owner’s Manual is Key: The single most reliable source of information for your specific vehicle is the owner’s manual. It will provide a detailed diagram of the Type A box layout, identifying the location and function of each fuse and fusible link.
- Online Resources: Online Toyota parts catalogs and forums can be helpful in identifying the correct Type A box layout for your vehicle. However, always cross-reference this information with your owner’s manual to ensure accuracy.
- VIN Lookup: Some online resources allow you to enter your vehicle’s VIN to retrieve specific information about its build, including the Type A box configuration.
- Visual Inspection: Carefully examine the Type A box in your vehicle and compare it to diagrams in your owner’s manual or online resources. Look for the specific fusible link you need to remove and note its location and orientation.
- Professional Assistance: If you’re unsure about the Type A box configuration in your vehicle, consult a qualified mechanic. They can quickly identify the correct fusible link and ensure that it is removed and replaced properly.
By understanding the variations in Toyota’s Type A box across different models and years, you can avoid mistakes and ensure that you’re working on the correct fusible link. At millertoyota.net, we provide resources and expert advice to help you navigate the complexities of your Toyota’s electrical system. This includes information on Toyota fuse box variations, model-specific car maintenance, and finding the right parts for your Toyota.
13. How Does a Damaged Fusible Link Affect Other Car Systems?
A damaged or blown fusible link can have a ripple effect on various systems within your Toyota. Since fusible links protect critical circuits, their failure can lead to a cascade of problems. Here’s how a damaged fusible link can affect other car systems:
- Complete System Shutdown: Fusible links often protect main power circuits. If one blows, it can shut down entire systems, such as the engine control unit (ECU), fuel pump, or ignition system.
- Loss of Power: A blown fusible link can cause a loss of power to essential components, such as headlights, taillights, or interior lights.
- Engine Performance Issues: If the fusible link protecting the fuel pump or ignition system blows, it can cause the engine to run poorly or not start at all.
- Transmission Problems: Some fusible links protect circuits related to the transmission. A blown link can cause shifting problems or even prevent the transmission from engaging.
- ABS and Stability Control Issues: The anti-lock braking system (ABS) and stability control system rely on electrical power to function properly. A blown fusible link can disable these safety features.
- Airbag Malfunctions: In some cases, a blown fusible link can affect the airbag system. This can prevent the airbags from deploying in a collision or cause them to deploy unexpectedly.
- Accessory Failures: A blown fusible link can cause accessories, such as the radio, power windows, or air conditioning, to stop working.
- Charging System Problems: The fusible link protecting the alternator circuit is crucial for charging the battery. If it blows, the battery may not charge, leading to a dead battery and a non-starting vehicle.
- Starting Problems: The starter motor relies on a fusible link for protection. A blown link can prevent the starter from engaging, making it impossible to start the engine.
- Diagnostic Trouble Codes (DTCs): A damaged fusible link can trigger various DTCs, making it difficult to diagnose the underlying problem.
Because a damaged fusible link can have such widespread effects, it’s important to diagnose and repair the problem as soon as possible. If you suspect a blown fusible link, check the fuse box and replace any blown links with the correct type and amperage rating.
At millertoyota.net, we understand the importance of a properly functioning electrical system. Our expert technicians can diagnose and repair any electrical problem in your Toyota, ensuring that all systems are working correctly. This includes electrical system failure analysis, identifying car system malfunctions, and providing Toyota troubleshooting assistance.
14. How to Choose the Right Replacement Fusible Link
Selecting the correct replacement fusible link is crucial for the safety and proper functioning of your Toyota’s electrical system. Here are the key factors to consider when choosing a replacement:
- Amperage Rating: The amperage rating of the replacement fusible link must match the original. The amperage rating is typically printed on the fusible link itself or listed in your owner’s manual. Using a fusible link with a higher amperage rating can damage the circuit, while using one with a lower rating can cause it to blow prematurely.
- Type: The type of fusible link should also match the original. There are several types of fusible links, including standard, cartridge, and blade-type. Using the wrong type can affect the performance and protection of the circuit.
- Size: The size of the fusible link should match the original to ensure a proper fit in the fuse box.
- Voltage Rating: The voltage rating of the fusible link should be equal to or greater than the voltage of the circuit it protects. In most automotive applications, a 32-volt fusible link is sufficient.
- Interrupting Rating: The interrupting rating is the maximum current that the fusible link can safely interrupt. The replacement fusible link should have an interrupting rating that is equal to or greater than the maximum current that the circuit can experience.
- Brand Reputation: Choose a fusible link from a reputable brand to ensure quality and reliability.
- Material: Select the correct material, they are often made out of either metal or ceramic materials.
- Certification: Look for fusible links that are certified by a recognized testing organization, such as UL or CSA.
- Vehicle Compatibility: Ensure that the fusible link is specifically designed for use in your Toyota model and year.
- Owner’s Manual: Consult your owner’s manual for specific recommendations on replacement fusible links.
- Professional Advice: If you’re unsure about which fusible link to choose, consult a qualified mechanic.
Using the wrong replacement fusible link can have serious consequences, including electrical damage, fire, and personal injury. Always take the time to select the correct replacement and install it properly. At millertoyota.net, we offer a wide selection of high-quality fusible links that are specifically designed for Toyota vehicles. Our expert staff can help you choose the right fusible link for your needs and provide installation advice. This includes help with finding car electrical parts, automotive fuse selection assistance, and expert advice on Toyota components.
At Miller Toyota, located at 208 N Maple Grove Rd, Boise, ID 83704, United States, we understand the importance of keeping your Toyota running smoothly. If you’re experiencing fusible link issues or need any other automotive services, don’t hesitate to reach out to us. Our phone number is +1 (208) 376-8888, and you can also visit our website at millertoyota.net to explore our wide range of services and schedule an appointment. Let us help you keep your Toyota in top condition.
FAQ: Removing Fusible Links in Toyota Type A Boxes
- What happens if I use the wrong amperage fusible link?
Using a fusible link with a higher amperage can cause damage to the electrical components due to overcurrent, while a lower amperage can cause premature blowing. - Can I bypass a fusible link temporarily?
No, bypassing a fusible link is dangerous and can lead to severe electrical damage or fire. Always replace it with the correct type. - How often should I inspect my fusible links?
Inspect fusible links during regular maintenance checks, especially if you experience electrical issues or after any electrical work. - What does a blown fusible link look like?
A blown fusible link often has a visible break in the wire, melted plastic, or a blackened appearance. - Is it safe to remove a fusible link with the battery connected?
No, it is not safe. Always disconnect the negative terminal of the battery to prevent electrical shock and damage to the system. - Can moisture affect the fusible link?
Yes, moisture can cause corrosion and lead to premature failure of the fusible link. - Do all Toyota models use the same type of fusible link?
No, fusible links vary depending on the model, year, and specific electrical system configuration. - What tools do I need to remove a fusible link?
You typically need a socket set, wrench set, screwdrivers, pliers, and a multimeter. - Where can I find the correct fusible link for my Toyota?
Check your owner’s manual, online parts catalogs, or consult with a qualified mechanic. - How do I know if a fusible link is blown?
Use a multimeter to check for continuity. A blown fusible link will show no continuity.