Removing your 2007 Toyota Camry radio can seem daunting, but with the right tools and guidance, it’s manageable. At millertoyota.net, we provide clear instructions and resources to help you with this process, whether you’re upgrading to a new system or troubleshooting issues. You can easily enhance your in-car entertainment and ensure a seamless experience.
1. Why Would I Want to Remove My 2007 Toyota Camry Radio?
There are several reasons why you might want to remove the radio in your 2007 Toyota Camry. Enhanced features, updated technology, and troubleshooting can be a few reasons.
- Upgrade to a Modern System: Many older car radios lack features like Bluetooth, Apple CarPlay, Android Auto, or a touchscreen display. Upgrading to a modern aftermarket system can significantly enhance your driving experience.
- Troubleshooting Issues: If your current radio is malfunctioning—experiencing issues like no sound, static, or inability to tune to stations—removing it might be necessary for repair or replacement.
- Theft Prevention: In some cases, removing the radio can be a preventive measure against theft, especially in areas where car audio systems are frequently targeted.
- Customization: Some car enthusiasts prefer to install custom audio setups for better sound quality and performance, which requires removing the factory radio.
- Vehicle Resale Value: Installing a more modern radio system can potentially increase the resale value of your vehicle, making it a worthwhile upgrade.
2. What Tools and Materials Do I Need to Remove My 2007 Toyota Camry Radio?
Gathering the necessary tools and materials ahead of time will make the removal process smoother and more efficient. The proper tools also help prevent damage to your car’s interior.
Here’s a comprehensive list:
- Screwdrivers:
- A Phillips head screwdriver is essential for removing screws holding the dashboard panels and the radio in place.
- A flathead screwdriver can be useful for prying off plastic trim pieces gently.
- Plastic Pry Tools:
- These tools are designed to remove interior trim without causing scratches or damage. A set of plastic pry tools of varying sizes is ideal.
- Socket Set:
- A socket set with various sizes can be helpful for removing any bolts that might be securing the radio or dashboard components.
- Panel Removal Tool:
- A specialized panel removal tool can make removing clips and fasteners easier without damaging the surrounding plastic.
- Wire Strippers/Crimpers:
- If you plan to install an aftermarket radio, these tools will be necessary for connecting the new radio’s wiring harness.
- Wiring Harness Adapter:
- This adapter allows you to connect your new radio to the car’s existing wiring without cutting any wires. It ensures a clean and reversible installation.
- Electrical Tape or Heat Shrink Tubing:
- Use these to insulate and protect any exposed wires when connecting the new radio.
- Gloves:
- Wearing gloves can protect your hands and provide a better grip on tools and components.
- Shop Towels:
- Keep shop towels handy to wipe up any spills or clean dirty components.
- Flashlight or Headlamp:
- Good lighting is essential for seeing what you’re doing, especially in the darker recesses of the dashboard.
- Safety Glasses:
- Protect your eyes from dust and debris by wearing safety glasses.
- Magnetic Parts Tray:
- This tray will keep screws and small parts organized and prevent them from getting lost.
- Car Radio Removal Keys (DIN Tools):
- Some radios require specific keys to release them from the dashboard. Check if your Camry’s radio needs these.
3. What are the Step-by-Step Instructions for Removing the 2007 Toyota Camry Radio?
Removing the radio from your 2007 Toyota Camry involves a series of steps that require careful attention to detail. Follow these instructions to safely remove the radio without causing damage to your vehicle.
-
Prepare the Vehicle:
- Park your Toyota Camry on a level surface and turn off the ignition.
- Engage the parking brake to prevent the car from moving.
- Disconnect the negative terminal of the car battery to prevent electrical shorts or shocks during the removal process.
-
Remove the Side Panels:
- Locate the side panels on either side of the center console.
- Gently pry these panels off using your hands or a plastic pry tool. These panels are usually held in place by clips, so apply steady, even pressure.
- Set the panels aside in a safe place to avoid scratches or damage.
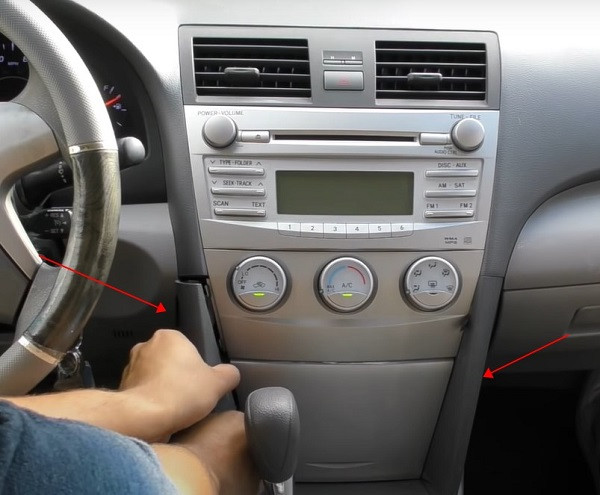 Side Panel Removal
 -
Remove the Screws:
- Once the side panels are removed, you will see two screws holding the lower dashboard trim in place.
- Use a Phillips head screwdriver to remove these screws.
- Keep the screws in a magnetic parts tray to prevent them from getting lost.
 Lower Dashboard Screws
 -
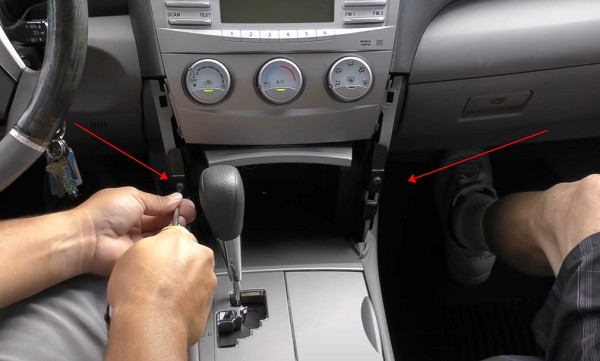
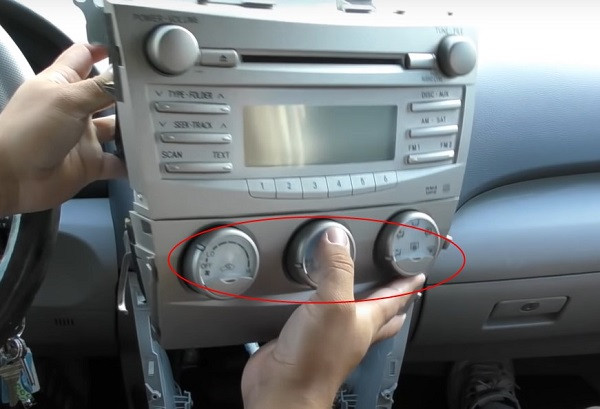
Remove the Shift Knob Surround:
- Set up the emergency brake to allow enough room to remove the shift knob.
- Carefully pry up the plastic handle around the shift knob.
- Use your hands to gently lift and remove the surround. Be cautious not to scratch the surrounding plastic.
 Shift Knob Surround Removal
 -
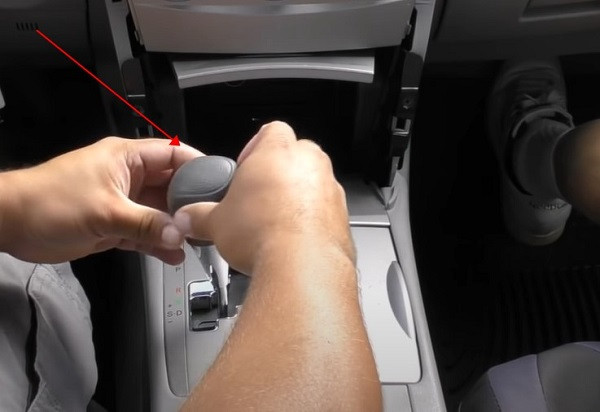
Remove the Container Panel:
- Locate the container panel, which is the section surrounding the gear shift.
- Use your hands or a plastic pry tool to gently pry up this panel.
- Start from one edge and work your way around, releasing the clips that hold it in place.
- Set the container panel aside.
 Container Panel Removal
 -
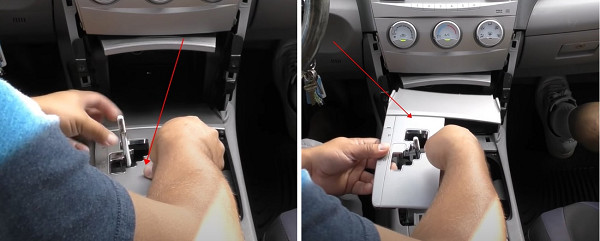
Remove the Entire Container Structure:
- With the container panel removed, you can now remove the entire container structure.
- Use a plastic pry tool to release any remaining clips or fasteners holding it in place.
- Lift the structure out carefully and set it aside.
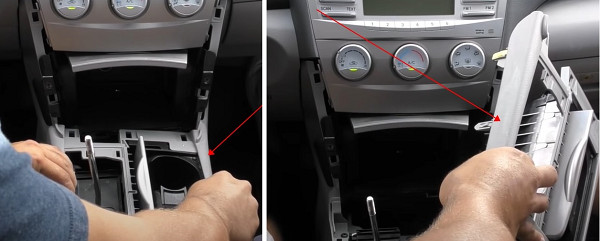 Container Structure Removal
 -
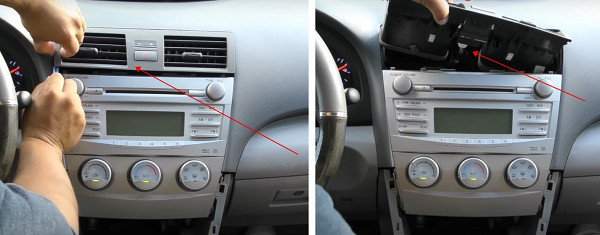
Remove the Radio Trim Panel:
- Locate the trim panel surrounding the radio. This panel is usually held in place by clips and sometimes screws.
- If there are screws, remove them with a Phillips head screwdriver.
- Use a plastic pry tool to gently pry around the edges of the trim panel, releasing the clips.
- Once the clips are released, carefully pull the trim panel away from the dashboard.
- Disconnect any electrical connectors attached to the trim panel, such as those for the hazard lights or climate control.
 Radio Trim Panel Removal
 -
Remove the Vent:
- Use a plastic pry tool to carefully pry the vent.
- Plug the connector.
 Vent Removal
 -
Remove the Radio Unit:
- With the trim panel removed, you will now have access to the radio unit itself.
- Locate the four screws (two at the upper inside, two at the bottom inside) that secure the radio to the dashboard.
- Use a Phillips head screwdriver to remove these screws.
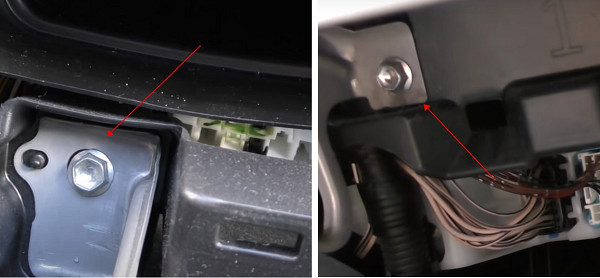 Radio Unit Screws
 -
Disconnect the Radio Connectors:
- Carefully slide the radio unit out of the dashboard.
- Reach behind the radio and disconnect all the electrical connectors attached to it. These connectors may have clips that need to be pressed to release them.
- Note the location of each connector to ensure you can reconnect them properly later.
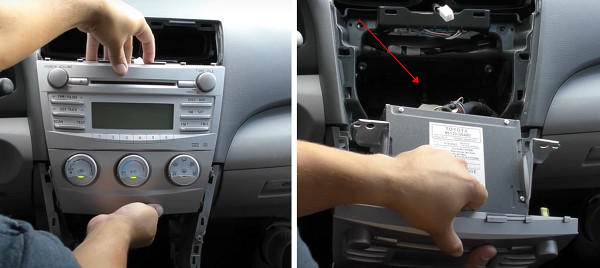 Radio Unit Removal
 -
Remove Control Buttons (If Necessary):
- If you plan to install the control buttons on the new radio, remove them from the old radio.
- Carefully detach these buttons, noting their positions for reinstallation.
 Control Buttons Removal
4. What Should I Do After Removing the Radio?
After successfully removing the radio from your 2007 Toyota Camry, several options are available, depending on your goals. Here’s what you can do next:
- Install a New Radio:
- If your goal was to upgrade to a new radio system, you can now proceed with the installation. Ensure you have the correct wiring harness adapter for your 2007 Toyota Camry to make the installation process smoother.
- Connect the wiring harness adapter to the car’s existing wiring and then plug it into the new radio. Secure the new radio in the dashboard and test its functionality before fully reassembling the dashboard components.
- Repair the Existing Radio:
- If you removed the radio to address a specific issue, you can now attempt to repair it. Check for any loose connections, damaged components, or blown fuses.
- If you’re not comfortable performing the repair yourself, consider taking the radio to a professional audio repair shop.
- Reinstall the Original Radio:
- If you don’t want to install a new radio or repair the existing one, you can reinstall the original radio.
- Reconnect all the wiring connectors to the radio, slide it back into the dashboard, and secure it with the screws you removed earlier.
- Inspect and Clean:
- Take this opportunity to inspect and clean the dashboard area behind the radio. Remove any dust, debris, or dirt that may have accumulated over time.
- Use a soft cloth and a mild cleaning solution to wipe down the surfaces, ensuring they are dry before reinstalling any components.
- Secure the Wiring:
- Ensure that all wiring is properly secured and routed to prevent it from interfering with the operation of the radio or other dashboard components.
- Use zip ties or electrical tape to bundle the wires and keep them organized.
- Test the System:
- Before fully reassembling the dashboard, reconnect the car battery and test the radio to ensure it is working correctly.
- Check all functions, including the radio, CD player, Bluetooth connectivity (if applicable), and any other features of the radio.
- Reassemble the Dashboard:
- Once you’re satisfied that the radio is working correctly, begin reassembling the dashboard components in the reverse order of removal.
- Ensure that all clips, screws, and panels are properly aligned and securely fastened.
5. What are Common Problems Encountered During Radio Removal and How Can I Avoid Them?
Removing a car radio can sometimes present challenges. Knowing these potential issues and how to avoid them can save time and prevent damage to your vehicle.
- Stripped Screws:
- Problem: Screws can become stripped if the wrong size screwdriver is used or if too much force is applied.
- Solution: Use the correct size and type of screwdriver. Apply steady, even pressure and turn slowly. If a screw is already stripped, use a screw extractor or try placing a rubber band between the screwdriver and the screw for better grip.
- Broken Trim Pieces:
- Problem: Plastic trim pieces can break or crack if excessive force is used during removal.
- Solution: Use plastic pry tools specifically designed for removing trim. Work slowly and gently, applying pressure evenly. If a trim piece is particularly stubborn, try using a heat gun on a low setting to soften the plastic slightly.
- Lost Screws and Small Parts:
- Problem: Screws and small parts can easily get lost during the removal process.
- Solution: Use a magnetic parts tray to keep all screws and small parts organized. Work in a clean, well-lit area, and take your time to avoid misplacing anything.
- Damaged Wiring:
- Problem: Wires can be damaged if they are pulled too hard or cut accidentally.
- Solution: Disconnect the battery before starting any electrical work. Use care when disconnecting wiring connectors, and never pull on the wires themselves. If you need to cut any wires, use wire strippers and be sure to insulate the connections properly when reconnecting.
- Incorrect Wiring Connections:
- Problem: When installing a new radio, it’s possible to make incorrect wiring connections, which can cause the radio to malfunction or damage the car’s electrical system.
- Solution: Use a wiring harness adapter specifically designed for your car model. Follow the wiring diagram carefully and double-check all connections before powering on the radio.
- Difficulty Removing the Radio:
- Problem: The radio may be difficult to remove if it is stuck or if there are hidden screws or clips.
- Solution: Consult the service manual for your car model to identify the location of all screws and clips. Use a flashlight to look for hidden fasteners. If the radio is stuck, try gently rocking it back and forth while applying pressure.
- Forgetting to Disconnect the Battery:
- Problem: Working on the car’s electrical system without disconnecting the battery can lead to electrical shorts, blown fuses, or even injury.
- Solution: Always disconnect the negative terminal of the car battery before starting any electrical work. This will prevent any accidental shorts or shocks.
- Damaging the Dashboard:
- Problem: The dashboard can be scratched or dented if tools are used improperly.
- Solution: Use plastic pry tools to protect the dashboard from scratches. Work carefully and avoid using excessive force. Place a cloth or towel over the dashboard to protect it from accidental damage.
6. What Aftermarket Radios are Compatible with the 2007 Toyota Camry?
Many aftermarket radios are compatible with the 2007 Toyota Camry, offering a range of features and functionalities to enhance your driving experience. You can easily find a new unit for your car.
- Single DIN Radios:
- These are standard-sized radios that fit into a single DIN slot (2 x 8 inches). They are a good option if you want a basic upgrade without changing the dashboard configuration.
- Features: Some single DIN radios come with Bluetooth connectivity, USB ports, auxiliary inputs, and CD players.
- Double DIN Radios:
- These radios are larger and fit into a double DIN slot (4 x 8 inches). They often feature touchscreen displays and more advanced functionalities.
- Features: Double DIN radios can include GPS navigation, Apple CarPlay, Android Auto, Bluetooth, DVD players, and backup camera integration.
- Android Auto and Apple CarPlay Radios:
- These radios are designed to seamlessly integrate with your smartphone, allowing you to use apps like Google Maps, Apple Maps, Spotify, and more directly on the radio’s display.
- Bluetooth Radios:
- Bluetooth-enabled radios allow you to make hands-free calls and stream music wirelessly from your smartphone or other Bluetooth devices.
- GPS Navigation Radios:
- These radios come with built-in GPS navigation systems, providing turn-by-turn directions and real-time traffic updates.
- Touchscreen Radios:
- Touchscreen radios offer a modern and user-friendly interface, making it easy to control various functions and settings.
- Backup Camera Compatible Radios:
- These radios can be connected to a backup camera, providing a clear view of what’s behind your car when reversing, enhancing safety and convenience.
When selecting an aftermarket radio for your 2007 Toyota Camry, consider the features that are most important to you, such as smartphone integration, navigation, Bluetooth connectivity, and sound quality. Also, ensure that the radio is compatible with your car’s wiring and that you have the necessary adapters for a seamless installation.
7. What are the Benefits of Upgrading to an Aftermarket Radio?
Upgrading to an aftermarket radio in your 2007 Toyota Camry offers numerous benefits, enhancing your driving experience with modern features and improved functionality.
- Enhanced Audio Quality:
- Aftermarket radios often come with better amplifiers and audio processing capabilities, resulting in improved sound quality compared to factory radios.
- You can enjoy clearer, more vibrant sound with enhanced bass and treble response.
- Modern Features:
- Many aftermarket radios offer modern features such as Bluetooth connectivity, Apple CarPlay, Android Auto, and touchscreen displays, which are not available in older factory radios.
- These features allow you to seamlessly integrate your smartphone with the car’s audio system, providing access to navigation, music, and communication apps.
- GPS Navigation:
- Some aftermarket radios come with built-in GPS navigation systems, providing turn-by-turn directions and real-time traffic updates.
- This can be a significant upgrade if your factory radio doesn’t have navigation capabilities.
- Smartphone Integration:
- With Apple CarPlay and Android Auto, you can use your smartphone’s apps directly on the radio’s display, making it easier to access navigation, music, and communication features while driving.
- Hands-Free Calling:
- Bluetooth connectivity allows you to make hands-free calls, keeping your hands on the wheel and your focus on the road.
- This can improve safety and convenience while driving.
- Backup Camera Integration:
- Many aftermarket radios can be connected to a backup camera, providing a clear view of what’s behind your car when reversing.
- This can enhance safety and make parking easier.
- Customization Options:
- Aftermarket radios offer a wide range of customization options, allowing you to tailor the audio system to your specific preferences.
- You can adjust settings such as equalizer, fader, and balance to optimize the sound quality for your listening environment.
- Improved User Interface:
- Touchscreen displays and intuitive interfaces make it easier to control various functions and settings of the radio.
- This can improve the overall user experience and make it more enjoyable to use the car’s audio system.
8. What is the Cost of Removing and Replacing a Car Radio?
The cost of removing and replacing a car radio can vary widely depending on several factors, including the type of radio, the complexity of the installation, and whether you hire a professional installer.
- DIY vs. Professional Installation:
- DIY: If you choose to remove and replace the radio yourself, the cost will be lower, primarily involving the cost of the new radio and any necessary tools or wiring adapters.
- Professional Installation: Hiring a professional installer will add to the cost but can ensure a proper and safe installation.
- Cost Factors:
- New Radio: The price of an aftermarket radio can range from $50 for a basic single DIN radio to $500 or more for a high-end double DIN radio with advanced features like GPS navigation, Apple CarPlay, and Android Auto.
- Wiring Harness Adapter: A wiring harness adapter typically costs between $10 and $30. This adapter is essential for connecting the new radio to the car’s existing wiring without cutting any wires.
- Installation Kit: An installation kit, which includes mounting brackets and trim panels, can cost between $10 and $50. This kit ensures that the new radio fits properly in the dashboard.
- Tools: If you don’t already have the necessary tools, such as screwdrivers, plastic pry tools, and wire strippers, you may need to purchase them. The cost of these tools can range from $20 to $100.
- Professional Installation Labor: If you hire a professional installer, labor costs can range from $50 to $200, depending on the complexity of the installation. Some installations may require more time and expertise, resulting in higher labor costs.
- Cost Estimates:
- Basic DIY Installation: For a basic single DIN radio installation, the total cost could be between $80 and $200, including the radio, wiring adapter, and any necessary tools.
- Advanced DIY Installation: For a more advanced double DIN radio installation with features like GPS navigation and smartphone integration, the total cost could be between $300 and $700, including the radio, wiring adapter, installation kit, and tools.
- Professional Installation: Hiring a professional installer can add $50 to $200 to the total cost, depending on the complexity of the installation.
9. What Safety Precautions Should I Take When Removing a Car Radio?
When removing a car radio, safety should be a top priority to prevent injuries and damage to your vehicle. Here are some essential safety precautions to follow:
- Disconnect the Battery:
- Before starting any electrical work, disconnect the negative terminal of the car battery. This will prevent electrical shorts, blown fuses, and potential injuries.
- Use a wrench to loosen the nut on the negative terminal and carefully remove the cable. Secure the cable away from the terminal to prevent accidental contact.
- Use the Right Tools:
- Use the correct size and type of screwdrivers, wrenches, and pry tools to avoid stripping screws, breaking trim pieces, or damaging wiring.
- Plastic pry tools are essential for removing interior trim without scratching or cracking the plastic.
- Wear Safety Glasses and Gloves:
- Wear safety glasses to protect your eyes from dust, debris, and flying objects.
- Wear gloves to protect your hands from sharp edges, chemicals, and electrical shock.
- Work in a Well-Lit Area:
- Ensure that you are working in a well-lit area so you can see what you are doing and avoid mistakes.
- Use a flashlight or headlamp to illuminate dark areas of the dashboard.
- Take Your Time:
- Avoid rushing the removal process, as this can lead to mistakes and accidents.
- Work slowly and carefully, paying attention to detail.
- Secure the Vehicle:
- Park the vehicle on a level surface and engage the parking brake to prevent it from rolling.
- If you need to lift the vehicle, use jack stands to support it securely.
- Handle Electrical Components Carefully:
- When disconnecting electrical connectors, be gentle and avoid pulling on the wires.
- Use wire strippers to cut and strip wires, and insulate all connections properly with electrical tape or heat shrink tubing.
- Consult the Service Manual:
- Refer to the service manual for your car model for specific instructions and diagrams related to radio removal.
- This can help you avoid mistakes and ensure that you are following the correct procedures.
10. What are Some Tips for a Smooth Radio Removal Process?
Removing a car radio can be a straightforward process if you follow the right steps and take some precautions. Here are some tips to help ensure a smooth and successful radio removal:
- Gather All Necessary Tools:
- Before you begin, gather all the tools and materials you will need, including screwdrivers, plastic pry tools, a socket set, wire strippers, a wiring harness adapter, electrical tape, gloves, and safety glasses.
- Having everything on hand will save time and prevent frustration.
- Read the Service Manual:
- Consult the service manual for your car model to understand the specific steps and precautions for removing the radio.
- The service manual can provide valuable information about the location of screws, clips, and wiring connectors.
- Take Photos:
- Before you start disconnecting any wires or removing any parts, take photos of the dashboard and radio.
- These photos can serve as a reference when you are reassembling the dashboard, ensuring that you reconnect everything correctly.
- Label Everything:
- Use labels to identify wiring connectors and other components as you remove them.
- This will make it easier to reconnect everything properly and avoid confusion.
- Use Plastic Pry Tools:
- Plastic pry tools are essential for removing interior trim without scratching or cracking the plastic.
- Work slowly and gently, applying even pressure to release the clips.
- Keep Screws and Small Parts Organized:
- Use a magnetic parts tray to keep screws and small parts organized.
- This will prevent them from getting lost and make it easier to reassemble the dashboard.
- Disconnect the Battery:
- Always disconnect the negative terminal of the car battery before starting any electrical work.
- This will prevent electrical shorts, blown fuses, and potential injuries.
- Test the Radio Before Reassembly:
- Before you fully reassemble the dashboard, reconnect the car battery and test the radio to ensure it is working correctly.
- Check all functions, including the radio, CD player, Bluetooth connectivity (if applicable), and any other features of the radio.
Looking for a new ride or need maintenance on your current Toyota? Visit millertoyota.net today to explore our wide selection of vehicles and schedule your service appointment! Contact us at Address: 208 N Maple Grove Rd, Boise, ID 83704, United States or Phone: +1 (208) 376-8888.
Frequently Asked Questions (FAQ)
1. Can I replace my 2007 Toyota Camry radio myself?
Yes, you can replace your 2007 Toyota Camry radio yourself if you have the right tools and follow the correct steps. However, if you’re not comfortable with electrical work, it’s best to hire a professional.
2. What type of radio fits in a 2007 Toyota Camry?
A 2007 Toyota Camry can typically fit either a single DIN or a double DIN radio. Double DIN units offer more features like touchscreen displays and navigation.
3. Do I need a special wiring harness to install an aftermarket radio in my 2007 Toyota Camry?
Yes, you’ll need a wiring harness adapter to connect the aftermarket radio to your car’s existing wiring without cutting any wires.
4. How do I disconnect the car battery before removing the radio?
Use a wrench to loosen the nut on the negative terminal of the battery and carefully remove the cable. Secure the cable away from the terminal to prevent accidental contact.
5. What tools do I need to remove the radio from my 2007 Toyota Camry?
You’ll need screwdrivers (Phillips and flathead), plastic pry tools, a socket set, wire strippers/crimpers, and possibly car radio removal keys (DIN tools).
6. Can I install a radio with Apple CarPlay or Android Auto in my 2007 Toyota Camry?
Yes, many aftermarket radios with Apple CarPlay and Android Auto are compatible with the 2007 Toyota Camry.
7. What should I do if I strip a screw while removing the radio?
Use a screw extractor or try placing a rubber band between the screwdriver and the screw for better grip.
8. How do I prevent damaging the dashboard when removing the radio trim?
Use plastic pry tools designed for removing trim and apply steady, even pressure to release the clips without scratching or cracking the plastic.
9. What if my new radio doesn’t turn on after installation?
Check the wiring connections, ensure the wiring harness adapter is properly connected, and verify that the car’s fuses are intact.
10. Where can I find a reliable professional to install my new car radio?
You can find reliable professionals at local car audio shops or through online directories. Be sure to check reviews and ask for recommendations.