Removing your Toyota steering wheel emblem allows for customization and personalization, and millertoyota.net is here to guide you through the process. This comprehensive guide will walk you through the steps of safely removing the emblem, prepping it for paint or replacement, and reassembling everything correctly, ensuring a seamless and satisfying DIY experience. For expert Toyota service and genuine parts, visit millertoyota.net and explore our Boise, Idaho location for all your automotive needs, from emblem customization to routine maintenance.
1. What Is The Purpose of Removing the Toyota Steering Wheel Emblem?
Removing the Toyota steering wheel emblem allows you to customize the look of your vehicle’s interior. Customization, personalization, and repair are all viable reasons. This can involve painting the emblem, replacing it with a new one, or simply removing it for a cleaner aesthetic. This small change can significantly impact the overall feel of your Toyota’s interior, reflecting your unique style.
1.1. Why Customize Your Toyota Steering Wheel Emblem?
Customizing your Toyota steering wheel emblem lets you personalize your vehicle. Many owners choose to paint their emblem to match their car’s color scheme or add a unique accent. Others might replace the emblem with a custom design or a blacked-out version for a sleek, modern look. According to a survey by the Specialty Equipment Market Association (SEMA), personalizing vehicle aesthetics is a popular trend among car enthusiasts.
1.2. Reasons for Replacing the Steering Wheel Emblem.
Replacing a damaged or worn-out emblem restores your steering wheel’s original look. Over time, the emblem can fade, scratch, or even break. Replacing it ensures your steering wheel looks as good as new, maintaining the vehicle’s overall aesthetic. Genuine Toyota replacement parts, available at millertoyota.net, guarantee a perfect fit and finish.
1.3. Is it Possible to Completely Remove the Steering Wheel Emblem?
Removing the emblem provides a minimalist, streamlined appearance. Some owners prefer a clean, de-badged look. Removing the emblem creates a subtle yet noticeable change, giving the steering wheel a more modern and understated appearance. However, it’s essential to consider the potential impact on the vehicle’s resale value, as some buyers prefer the original badging.
2. What Tools and Materials Are Needed to Remove a Toyota Steering Wheel Emblem?
Gathering the right tools and materials ensures a smooth and safe emblem removal. Below is a list of essential items you’ll need for the job.
- 10 mm wrench
- T30 Torx screwdriver
- Phillips screwdriver
- Plastic pry tools
- Microfiber towel
- Micro-set flat-head screwdriver
- Needle-nose pliers
- 8 mm socket and ratchet
- Chisel
- Model/craft sanding sticks
- Primer, paint, and clear coat (if painting)
- Isopropyl alcohol
- Adhesive for plastics
2.1. Why Are Specific Tools Necessary?
Using the right tools prevents damage to your steering wheel and airbag components. For instance, plastic pry tools help avoid scratching the plastic trim, while a Torx screwdriver is essential for removing specific screws without stripping them. According to Toyota service manuals, using the correct tools ensures the job is done safely and efficiently.
2.2. Can I Use Alternative Tools?
While some tasks can be accomplished with substitute tools, precision is essential. For example, a flat-head screwdriver might replace a plastic pry tool, but it increases the risk of scratching the steering wheel. If you choose alternatives, proceed with caution and prioritize safety.
2.3. What Kind of Adhesive Should I Use?
Choose an adhesive specifically designed for plastics to reattach the emblem securely. Options like JB Kwick Weld or other plastic-compatible adhesives ensure a strong, lasting bond. Always follow the manufacturer’s instructions for the best results.
3. Safety First: What Precautions Should I Take Before Starting?
Safety is paramount when working with your vehicle’s steering wheel, especially considering the airbag system. Take these precautions before starting the removal process.
- Disconnect the Battery: Disconnect the negative battery cable and wait at least 5 minutes before starting.
- Work Area: Work in a clean, well-lit area.
- Airbag Handling: Handle the airbag unit carefully to prevent accidental deployment.
3.1. Why Disconnect the Battery?
Disconnecting the battery prevents accidental airbag deployment, which could cause serious injury. This step ensures the electrical system is completely de-energized, eliminating the risk of any unintended activation.
3.2. How Long Should I Wait After Disconnecting the Battery?
Waiting at least 5 minutes allows the system to fully discharge any residual electricity. This waiting period is crucial for ensuring safety. Some Toyota models may require a longer waiting time, so consult your vehicle’s service manual for specific instructions.
3.3. What If I’m Not Comfortable Working With the Airbag?
If you’re not comfortable handling the airbag, it’s best to seek professional assistance. Visit millertoyota.net in Boise, Idaho, for expert service technicians who can safely remove and reinstall your steering wheel emblem. Our team ensures the job is done correctly, giving you peace of mind.
4. Step-by-Step Guide: Removing the Toyota Steering Wheel Emblem
Follow these detailed steps to safely remove your Toyota steering wheel emblem:
- Disconnect the Negative Battery Cable: Use a 10 mm wrench to disconnect the negative battery cable and wait at least 5 minutes.
- Remove Side Covers: Use a pry tool to remove the trapezoid-shaped cover plates on each side of the steering wheel.
- Loosen Torx Screws: Use the T30 Torx screwdriver to loosen the screws on each side of the steering wheel.
- Detach Horn/Airbag Assembly: Gently pull up and maneuver the horn/airbag assembly to expose the wires and connectors.
- Disconnect Wire Connectors: Use a micro flat-head screwdriver to pop up the yellow clamp fasteners on the orange and black wire connectors.
- Remove Connectors: Carefully apply pressure to disconnect the wire connectors.
- Detach Black Wire: Use pliers to remove the black wire with the blade connection.
- Separate Horn Housing: Remove the four 8 mm nuts using an 8 mm socket and ratchet.
- Remove Gas Inflator: Remove the gas inflator unit for easier handling.
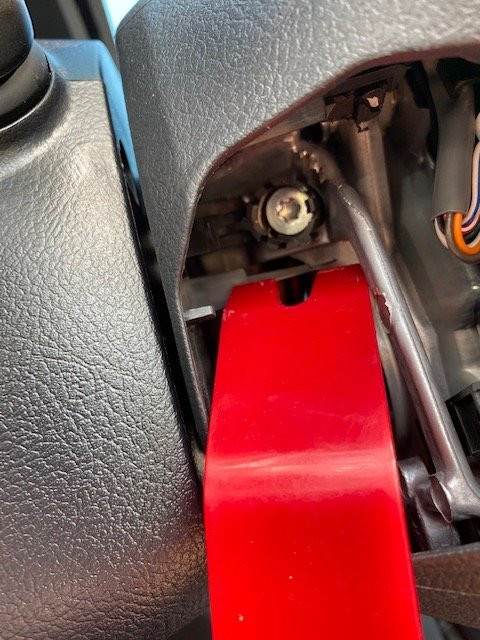
- Detach Airbag Module: Use pry tools to loosen the metal prongs holding the airbag module in place.
- Access Emblem: With the airbag module removed, you can access the back of the Toyota emblem.
- Remove Emblem: Use a chisel to carefully pop off the plastic welds holding the emblem in place.
4.1. What Do I Do If the Side Covers Are Hard to Remove?
If the side covers are difficult to remove, use a plastic pry tool to gently work around the edges. Avoid using excessive force, which can damage the plastic. Applying slight pressure and wiggling the tool should help loosen the covers without causing harm.
 Prying tool removing a side cover of the steering wheel
4.2. How Do I Handle the Wire Connectors?
The wire connectors can be delicate, so handle them with care. Use a micro flat-head screwdriver or dental pick to gently lift the yellow clamp fasteners before disconnecting the wires. This ensures you don’t damage the connectors.
4.3. What If the Airbag Module Is Stuck?
If the airbag module is stuck, double-check that you’ve removed all the nuts and screws holding it in place. Use multiple pry tools to gently and evenly loosen the metal prongs. Work slowly and methodically to avoid damaging the plastic housing.
 Prying tool removing airbag module from steering wheel.
4.4. How Do I Remove the Emblem if There Are No Plastic Welds?
Some emblems are held in place with adhesive rather than plastic welds. In this case, use a heat gun or hairdryer to gently heat the back of the emblem, softening the adhesive. Then, use a plastic pry tool to carefully lift the emblem away from the steering wheel. Be patient and avoid using excessive force.
5. Preparing the Emblem for Painting or Replacement
Once the emblem is removed, it’s time to prepare it for painting or replacement. Follow these steps for the best results:
- Clean the Emblem: Use isopropyl alcohol to clean the emblem thoroughly, removing any dirt, grease, or residue.
- Sand the Emblem: Use model/craft sanding sticks to lightly sand the chrome surface, creating a smooth surface for the paint to adhere to.
- Prime the Emblem: Apply a thin, even coat of plastic primer to the emblem. This helps the paint bond to the plastic and prevents chipping.
5.1. Why Is Sanding Necessary?
Sanding the emblem creates a rough surface that the primer can grip onto. This ensures the paint adheres properly, resulting in a durable, long-lasting finish. Without sanding, the paint may peel or chip over time.
5.2. What Kind of Primer Should I Use?
Use a primer specifically designed for plastics. These primers contain additives that help them bond to plastic surfaces, providing a strong foundation for the paint. Avoid using metal primers, which may not adhere well to plastic and can lead to cracking or peeling.
5.3. Can I Skip the Priming Step?
Skipping the priming step can result in a poor paint job that is prone to chipping and peeling. Primer acts as a bonding agent, ensuring the paint adheres properly to the plastic surface. For the best results, always prime the emblem before painting.
6. Painting the Emblem: A Step-by-Step Guide
If you choose to paint your Toyota steering wheel emblem, follow these steps for a professional-looking finish:
- Apply Base Coat: Apply several thin, even coats of your chosen paint color. Allow each coat to dry completely before applying the next.
- Apply Clear Coat: Apply several thin, even coats of clear coat to protect the paint and give it a glossy finish.
- Allow to Dry: Allow the emblem to dry completely before handling or reattaching it to the steering wheel.
6.1. How Many Coats of Paint Should I Apply?
Apply enough coats of paint to achieve full, even coverage. Typically, two to three coats of base coat and two to three coats of clear coat are sufficient. Be sure to allow each coat to dry completely before applying the next to avoid runs and drips.
6.2. What Type of Paint Is Best for Plastic Emblems?
Use automotive-grade paints specifically designed for plastic surfaces. These paints are flexible and durable, able to withstand temperature changes and impacts without cracking or peeling. Avoid using enamel or lacquer paints, which can become brittle and crack over time.
6.3. How Can I Prevent Paint Runs and Drips?
Prevent paint runs and drips by applying thin, even coats of paint. Hold the spray can about 10-12 inches away from the emblem and move it in a smooth, consistent motion. Avoid applying too much paint in one area. If you do get a run or drip, allow the paint to dry completely, then sand it smooth and apply another coat.
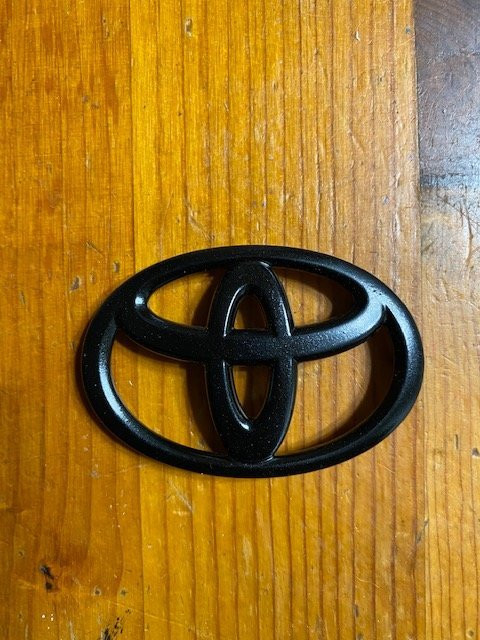 Painted Toyota emblem.
7. Reattaching the Emblem to the Steering Wheel
After painting or replacing the emblem, it’s time to reattach it to the steering wheel. Follow these steps carefully:
- Apply Adhesive: Apply a medium-high strength adhesive to the back of the emblem.
- Position Emblem: Carefully position the emblem onto the horn/airbag plastic shell, ensuring it is aligned correctly.
- Secure Emblem: Press the emblem firmly into place and hold it until the adhesive sets.
- Reassemble Airbag Components: Reassemble the airbag components into the plastic shell, following the reverse order of removal.
- Reconnect Wire Connectors: Reconnect the wire connectors to the horn/airbag assembly, ensuring they are securely fastened.
- Reattach Horn/Airbag Assembly: Gently maneuver the horn/airbag assembly back onto the steering wheel and tighten the Torx screws.
- Reattach Side Covers: Snap the side covers back into place on each side of the steering wheel.
- Reconnect Battery: Reconnect the negative battery cable and test the horn and steering wheel controls to ensure they are functioning properly.
7.1. How Much Adhesive Should I Use?
Use enough adhesive to create a strong, secure bond, but avoid using too much, which can squeeze out and create a mess. Apply a thin, even layer of adhesive to the back of the emblem, focusing on the areas that will make contact with the plastic shell.
7.2. How Long Should I Hold the Emblem in Place?
Hold the emblem in place for as long as the adhesive manufacturer recommends, typically a few minutes. This allows the adhesive to begin to set, ensuring the emblem stays in place. You can also use painter’s tape to hold the emblem in place while the adhesive fully cures.
7.3. What If the Reassembled Components Don’t Fit Properly?
If the reassembled components don’t fit properly, double-check that you have reconnected all the wire connectors and aligned the airbag components correctly. Make sure that no wires are pinched or obstructed. If you continue to have trouble, consult a professional mechanic at millertoyota.net in Boise, Idaho.
8. Common Mistakes to Avoid When Removing and Reattaching the Emblem
Avoiding common mistakes ensures a successful emblem removal and reattachment process. Here are some pitfalls to watch out for:
- Forgetting to Disconnect the Battery: Always disconnect the negative battery cable to prevent accidental airbag deployment.
- Using the Wrong Tools: Using the correct tools prevents damage to the steering wheel and airbag components.
- Applying Too Much Force: Applying too much force can damage the plastic trim and airbag components.
- Skipping the Priming Step: Priming ensures the paint adheres properly and prevents chipping.
- Using the Wrong Adhesive: Using an adhesive designed for plastics ensures a strong, lasting bond.
- Rushing the Process: Rushing the process can lead to mistakes and potential damage.
8.1. What Happens If the Airbag Deploys Accidentally?
If the airbag deploys accidentally, it can cause serious injury. The force of the deployment can throw you against the steering wheel or dashboard, causing broken bones, concussions, and other injuries. If the airbag deploys accidentally, seek medical attention immediately.
8.2. How Can I Avoid Damaging the Plastic Trim?
Avoid damaging the plastic trim by using plastic pry tools and applying gentle, even pressure. Work slowly and methodically, and avoid using excessive force. If you encounter resistance, double-check that you have removed all the screws and fasteners holding the trim in place.
8.3. What If the New Emblem Doesn’t Fit Properly?
If the new emblem doesn’t fit properly, double-check that you have purchased the correct emblem for your Toyota model. Compare the new emblem to the old emblem to ensure they are the same size and shape. If the emblem is slightly too large, you may be able to trim it down with a sharp knife or file. If the emblem is too small, you may need to purchase a different emblem. Genuine Toyota parts from millertoyota.net guarantee a perfect fit.
9. Alternatives to Removing the Emblem: Overlays and Skins
If you’re not comfortable removing the emblem, consider using overlays or skins as an alternative. These options allow you to customize the look of your steering wheel without disassembling it.
9.1. What Are Emblem Overlays?
Emblem overlays are adhesive covers that fit directly over the existing emblem. They are available in various colors and designs, allowing you to easily change the look of your steering wheel without removing the original emblem.
9.2. What Are Steering Wheel Skins?
Steering wheel skins are vinyl or leather covers that wrap around the entire steering wheel, including the emblem. They provide a more comprehensive customization option, allowing you to change the color, texture, and overall look of your steering wheel.
9.3. Are Overlays and Skins Easy to Install?
Yes, overlays and skins are generally easy to install. Most overlays come with adhesive backing, allowing you to simply peel and stick them onto the emblem. Steering wheel skins may require a bit more effort to install, but they typically come with instructions and can be installed in a matter of minutes.
10. Maintaining Your Customized Steering Wheel Emblem
Maintaining your customized steering wheel emblem ensures it looks great for years to come. Follow these tips to keep your emblem in top condition:
- Clean Regularly: Clean the emblem regularly with a mild soap and water solution to remove dirt, dust, and fingerprints.
- Avoid Harsh Chemicals: Avoid using harsh chemicals or abrasive cleaners, which can damage the paint or adhesive.
- Protect from Sunlight: Protect the emblem from direct sunlight, which can cause the paint to fade over time.
- Touch Up Paint: Touch up any chips or scratches in the paint as soon as possible to prevent rust or further damage.
10.1. How Often Should I Clean the Emblem?
Clean the emblem as needed, typically once a month or whenever it looks dirty. Regular cleaning prevents the buildup of dirt and grime, keeping the emblem looking its best.
10.2. What Should I Do If the Paint Starts to Fade?
If the paint starts to fade, you can apply a fresh coat of clear coat to protect the paint and restore its glossy finish. If the fading is severe, you may need to repaint the emblem entirely.
10.3. How Can I Prevent the Adhesive From Failing?
Prevent the adhesive from failing by using a high-quality adhesive and properly preparing the surface before attaching the emblem. Avoid exposing the emblem to extreme temperatures or moisture, which can weaken the adhesive over time.
11. Troubleshooting Common Issues
Even with careful preparation, you may encounter issues during the emblem removal and reattachment process. Here are some troubleshooting tips:
- Emblem Won’t Come Off: If the emblem won’t come off, double-check that you have removed all the screws, nuts, and fasteners holding it in place. Use a heat gun or hairdryer to soften the adhesive, and apply gentle, even pressure with a plastic pry tool.
- Paint Is Chipping: If the paint is chipping, ensure you properly prepared the surface by sanding and priming the emblem before painting. Use automotive-grade paints specifically designed for plastic surfaces, and apply several thin, even coats of clear coat to protect the paint.
- Adhesive Is Not Holding: If the adhesive is not holding, ensure you are using a high-quality adhesive specifically designed for plastics. Clean the surfaces thoroughly with isopropyl alcohol before applying the adhesive, and allow the adhesive to fully cure before handling the emblem.
- Airbag Light Is On: If the airbag light is on after reassembling the steering wheel, double-check that you have reconnected all the wire connectors properly. If the light persists, consult a professional mechanic at millertoyota.net in Boise, Idaho.
11.1. What Do I Do If I Damage the Steering Wheel?
If you accidentally damage the steering wheel during the emblem removal process, consult a professional mechanic at millertoyota.net in Boise, Idaho. Our expert technicians can assess the damage and recommend the best course of action, whether it’s repairing the damage or replacing the steering wheel.
11.2. How Can I Prevent Stripping the Screws?
Prevent stripping the screws by using the correct size and type of screwdriver. Apply firm, even pressure when turning the screws, and avoid over-tightening them. If a screw is already stripped, you can try using a screw extractor or a rubber band to get a better grip.
11.3. What If I Can’t Reconnect the Wire Connectors?
If you can’t reconnect the wire connectors, double-check that they are aligned correctly and that the locking tabs are in the open position. Use a small screwdriver or pick to gently push the connectors into place until they click. Avoid forcing the connectors, which can damage the pins.
12. The Benefits of Professional Service at Miller Toyota
While removing and customizing your Toyota steering wheel emblem can be a rewarding DIY project, sometimes it’s best to seek professional assistance. At Miller Toyota in Boise, Idaho, our expert technicians provide top-notch service and ensure the job is done correctly and safely.
12.1. Why Choose Miller Toyota for Your Automotive Needs?
Miller Toyota offers a wide range of services, from routine maintenance to complex repairs. Our certified technicians use genuine Toyota parts and state-of-the-art equipment to ensure your vehicle receives the best possible care. We also offer competitive pricing and convenient scheduling to make your experience as seamless as possible.
12.2. What Services Does Miller Toyota Offer?
Miller Toyota offers a comprehensive range of services, including:
- Oil Changes
- Tire Rotations
- Brake Service
- Battery Replacement
- Engine Diagnostics
- Transmission Service
- Air Conditioning Service
- Steering Wheel Emblem Removal and Customization
12.3. How Can I Schedule a Service Appointment at Miller Toyota?
Scheduling a service appointment at Miller Toyota is easy. You can call us at +1 (208) 376-8888, visit our website at millertoyota.net, or stop by our dealership at 208 N Maple Grove Rd, Boise, ID 83704, United States. Our friendly staff will be happy to assist you with all your automotive needs.
13. Understanding Toyota Emblems and Branding
Toyota emblems represent more than just a logo; they embody the brand’s values and history. Understanding the significance of these emblems can enhance your appreciation for your vehicle.
13.1. What Is the History of the Toyota Emblem?
The Toyota emblem has evolved over the years, reflecting the company’s growth and innovation. The current emblem, introduced in 1989, consists of three overlapping ellipses, each representing the customer, the product, and the spirit of progress. These ellipses also symbolize the “T” for Toyota.
13.2. What Do the Different Toyota Emblems Signify?
Different Toyota models may feature variations of the emblem, such as the TRD (Toyota Racing Development) emblem, which signifies performance and racing heritage. Hybrid models often have blue accents in the emblem to denote their eco-friendly technology.
13.3. How Does Toyota Branding Influence Vehicle Design?
Toyota branding plays a significant role in vehicle design, influencing everything from the overall aesthetics to the placement of emblems and badges. The brand’s commitment to quality, reliability, and innovation is reflected in every aspect of the vehicle, creating a cohesive and recognizable identity.
14. The Future of Car Customization
Car customization is an ever-evolving trend, with new technologies and techniques emerging all the time. From advanced painting methods to innovative aftermarket accessories, the possibilities for personalizing your vehicle are endless.
14.1. What Are the Latest Trends in Car Customization?
Some of the latest trends in car customization include:
- Vinyl Wraps: Vinyl wraps allow you to change the color and finish of your vehicle without repainting it.
- Performance Upgrades: Performance upgrades enhance the power, handling, and overall driving experience of your vehicle.
- Custom Lighting: Custom lighting adds a unique and stylish touch to your vehicle’s exterior and interior.
- 3D-Printed Parts: 3D-printed parts allow you to create custom accessories and components tailored to your specific needs and preferences.
14.2. How Is Technology Changing Car Customization?
Technology is revolutionizing car customization, making it easier and more accessible than ever before. Advanced software allows you to design and visualize custom modifications before they are even made, while 3D printing enables you to create custom parts on demand.
14.3. What Can We Expect From Car Customization in the Future?
In the future, we can expect car customization to become even more personalized and integrated with technology. From AI-powered design tools to augmented reality applications, the possibilities for creating a truly unique and personalized driving experience are limitless.
15. FAQ: Removing Toyota Steering Wheel Emblems
Here are some frequently asked questions about removing Toyota steering wheel emblems:
15.1. Is it safe to remove the steering wheel emblem myself?
Yes, if you follow the proper safety precautions and steps outlined in this guide. However, if you’re uncomfortable working with the airbag system, it’s best to seek professional assistance.
15.2. Will removing the emblem void my warranty?
Removing the emblem itself should not void your warranty, but any damage caused during the removal process may not be covered.
15.3. Can I reuse the original emblem after removing it?
Yes, you can reuse the original emblem if it is in good condition. Clean it thoroughly and reattach it with a suitable adhesive.
15.4. How long does it take to remove the steering wheel emblem?
The removal process typically takes about 1-2 hours, depending on your experience and the complexity of the emblem attachment.
15.5. What should I do if I can’t find a replacement emblem?
If you can’t find a replacement emblem, contact Miller Toyota at millertoyota.net. Our parts department can help you find the correct emblem for your vehicle.
15.6. Can I paint the emblem while it’s still on the steering wheel?
No, it’s not recommended to paint the emblem while it’s still on the steering wheel. This can result in overspray and damage to the surrounding areas.
15.7. What’s the best way to clean the steering wheel after removing the emblem?
Use a mild soap and water solution to clean the steering wheel. Avoid using harsh chemicals or abrasive cleaners.
15.8. How do I know if I’ve reconnected the airbag system correctly?
If you’ve reconnected the airbag system correctly, the airbag light on your dashboard should turn off. If the light stays on, consult a professional mechanic.
15.9. Are there any legal restrictions on modifying my steering wheel?
There may be legal restrictions on modifying your steering wheel, depending on your local laws and regulations. Check with your local authorities before making any modifications.
15.10. Can I change the color of my Toyota emblem?
Yes, you can change the color of your Toyota emblem by painting it, using an overlay, or replacing it with a custom emblem.
 Clean plastic for emblem during reinstalling process.
Removing your Toyota steering wheel emblem can be a fulfilling project that adds a personal touch to your vehicle. By following this comprehensive guide and taking the necessary precautions, you can safely and successfully complete the job. Remember, for expert service and genuine Toyota parts, visit millertoyota.net and let our team in Boise, Idaho, assist you with all your automotive needs. Explore our website for the latest deals and schedule your next service appointment today.