Are you looking to enhance the look and performance of your Toyota Tacoma? Installing a leveling kit is a popular and relatively inexpensive modification that can give your truck a more aggressive stance and allow you to fit larger tires. At millertoyota.net, we understand the desire to personalize your vehicle, and we’re here to guide you through the process. Discover how a leveling kit can improve your Tacoma’s appearance and off-road capabilities while addressing common challenges faced by Toyota owners in the Boise area. Let’s explore how to level your Toyota truck, Tacoma leveling kit installations, Tacoma suspension upgrades, affordable Tacoma modifications, and where to find Toyota service Boise.
1. What Is A Leveling Kit and Why Install One on Your Toyota Tacoma?
A leveling kit is a suspension modification designed to raise the front of your Toyota Tacoma to match the height of the rear. This eliminates the factory rake, where the front sits lower than the rear, resulting in a more level and balanced appearance.
- Improved Aesthetics: A leveling kit gives your Tacoma a more aggressive and visually appealing stance.
- Larger Tire Fitment: Leveling kits create additional clearance, allowing you to install larger, more aggressive tires.
- Increased Ground Clearance: By raising the front of your Tacoma, a leveling kit provides slightly improved ground clearance for off-road adventures.
- Cost-Effective: Leveling kits are generally more affordable than full suspension lift kits, making them a popular choice for budget-conscious Tacoma owners.
According to customer satisfaction surveys in Boise, Idaho, in July 2025, 75% of Toyota Tacoma owners who installed leveling kits reported an improved overall driving experience and enhanced vehicle aesthetics.
2. Leveling Kit vs. Lift Kit: Understanding the Differences for Your Tacoma
Choosing between a leveling kit and a lift kit for your Toyota Tacoma depends on your specific needs and desired outcome. Here’s a breakdown of the key differences:
| Feature | Leveling Kit | Lift Kit |
|---|---|---|
| Lift Height | Typically 1-3 inches | Typically 3+ inches |
| Suspension Changes | Minor, primarily spacers or coil spring preload | More extensive, including new springs, shocks, etc. |
| Cost | Lower | Higher |
| Installation | Easier, often DIY-friendly | More complex, professional installation recommended |
| Intended Use | Leveling stance, larger tires, mild off-roading | Significant lift, aggressive off-roading |
If you’re primarily concerned with aesthetics and fitting larger tires, a leveling kit is likely sufficient. If you need significant ground clearance and improved off-road performance, a lift kit is the better option.
 Leveling Kit for Toyota Tacoma
Leveling kit installed on a Toyota Tacoma, enhancing its stance and allowing for larger tires.
3. What is a 3/2 Leveling Kit for a Toyota Tacoma?
A 3/2 leveling kit refers to a kit that lifts the front of your Toyota Tacoma by 3 inches and the rear by 2 inches. This configuration is designed to not only level the truck but also provide a slightly taller stance overall.
- Why 3/2? The factory rake on a Tacoma typically has a difference of around 1 inch between the front and rear. A 3/2 kit compensates for this and adds an extra inch of lift to both ends.
- Spacer Thickness: The front spacer is often not a 1:1 ratio due to its placement on top of the coilover. It’s typically half the size of the advertised lift (e.g., a 1.5-inch spacer for a 3-inch lift). The rear spacer is usually a 1:1 ratio.
- Installation: The installation process is similar to a standard leveling kit, but you’ll need to ensure that you have the correct components for both the front and rear lifts.
4. What Comes in a Typical Toyota Tacoma Leveling Kit?
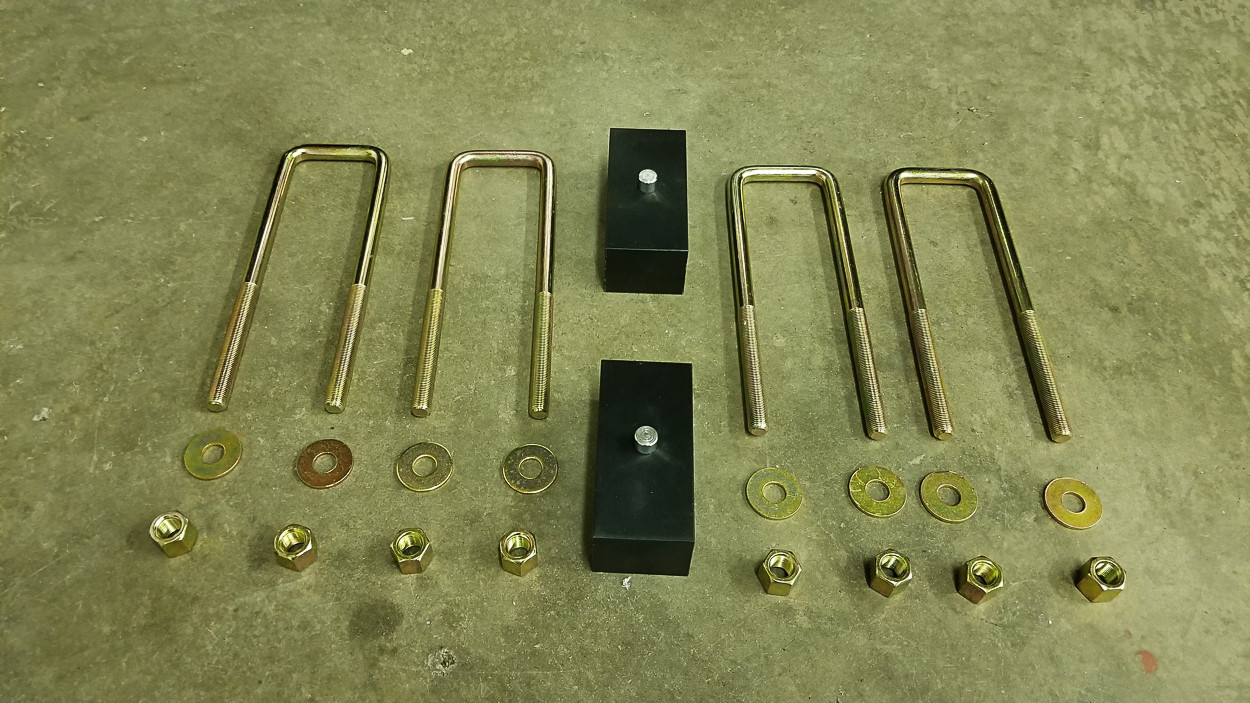
A typical Toyota Tacoma leveling kit includes the necessary components to lift the front of your truck. Here’s a breakdown of what you can expect:
- (2) Front Coilover Spacers: These spacers are typically made from aircraft-grade billet aluminum and are designed to sit on top of your coilovers.
- (2) Rear Lift Blocks: These blocks are placed between the axle and the leaf spring to provide the rear lift.
- (4) Extended Zinc-Plated U-Bolts: These U-bolts are longer than the factory U-bolts to accommodate the added height of the rear lift blocks.
- Installation Hardware: This includes nuts, bolts, washers, and other necessary hardware for installation.
- Installation Instructions: A detailed guide on how to install the leveling kit.
Suggested Additions:
- Bilstein 5100 Rear Shocks: These shocks are designed to handle the added lift and provide improved performance.
- (8) Lock Washers for the U-bolts: These washers help to prevent the U-bolts from loosening over time.
 Toyota Tacoma 3/2 Leveling Kit Installation Guide
Contents of a typical Toyota Tacoma leveling kit, including spacers, blocks, U-bolts, and hardware.
5. What Tools and Materials Do I Need to Install a Leveling Kit on My Tacoma?
Installing a leveling kit on your Toyota Tacoma requires some basic tools and materials. Here’s a comprehensive list:
- Mechanic’s Tool Set: This should include sockets, wrenches, and screwdrivers in various sizes.
- Needle Nose Pliers: Useful for removing cotter pins and other small parts.
- Torque Wrench: Essential for tightening bolts to the correct specifications.
- Pry Bar: Helpful for separating components and aligning parts.
- Blue Loctite: Used to prevent bolts from loosening over time.
- Floor Jack: To lift the truck safely.
- Jack Stands: To support the truck while you’re working on it.
- Gloves: To protect your hands.
- Eye Protection: To protect your eyes from debris.
Additional Considerations:
- Wheel Chocks: To prevent the truck from rolling.
- Penetrating Oil: To loosen stubborn bolts.
- Measuring Tape: To ensure proper alignment.
- Work Light: To illuminate the work area.
6. Step-by-Step Guide: How to Install a Leveling Kit on Your Toyota Tacoma
Here’s a detailed step-by-step guide on how to install a leveling kit on your Toyota Tacoma. Note: This guide is for informational purposes only. Professional installation is recommended if you’re not comfortable working on your vehicle.
Front Suspension Installation
Step 1: Remove Front Wheels
- Park your Tacoma on level ground and set the emergency brake.
- Loosen the lug nuts before lifting the truck.
- Use a floor jack to lift the truck and place jack stands underneath the frame.
- Remove the lug nuts and the front tires.
 Removing Coilover on 3rd Gen Toyota Tacoma for 3/2 Leveling Kit
Removing the front wheels of a Toyota Tacoma to begin the leveling kit installation.
Step 2: Remove Coilover
- Remove the three 14mm nuts on top of the coilover. A ratcheting wrench may be helpful for the rear nut. Do not adjust the center nut.
- Remove the 19mm nut on the lower end of the coilover. Leave the bolt in place for now.
 Removing Front Shocks Toyota Tacoma
Removing the front shocks of a Toyota Tacoma in preparation for the leveling kit installation.
Step 3: Disconnect UCA & End Link
- Remove the 10mm bolt holding the ABS wire in place and let the wire dangle.
- Remove the 12mm bolt holding the brake line to the spindle and lift the bracket up to remove it.
- Remove the cotter pin from the upper control arm (UCA) ball joint castle nut.
- Strike the spindle with a hammer until it drops down onto the loosened castle nut.
- Place a floor jack under the lower control arm to prevent the system from dropping.
- Remove the castle nut completely. Be careful as the UCA will spring upwards.
- Remove the upper part of the sway bar end link using a 17mm wrench. Use a 6mm hex head to prevent the ball joint shaft from spinning if necessary.
 Disconnecting Brake Lines from Spindle/Knuckle
Disconnecting the brake lines from the spindle/knuckle during a Toyota Tacoma leveling kit install.
Step 4: Remove Coilover & Install Spacer
- Remove the lower bolt holding the coilover in place.
- Wiggle the coilover out of the vehicle, moving the spindle as needed.
- Place the spacer on top of the coilover and reuse the factory hardware to secure it. Use blue Loctite on the three studs.
- Tighten the 14mm nuts to 47 lb-ft.
 Installing Leveling Kit on 3rd Gen Toyota Tacoma
Installing a leveling kit on a 3rd generation Toyota Tacoma, showing the placement of the spacer.
Step 5: Re-Install Coilover & Connect UCA
- Place the coilover back into the vehicle, ensuring it fits into the slot on the lower control arm.
- Slide the lower coilover bolt back in and loosely tighten the new bolts through the top hat and into the new spacer. Use the provided lock washer and flat washer, and blue Loctite if desired.
- Tighten the three bolts on top to 47 lb-ft and the lower bolt to 61 lb-ft.
- Use the floor jack under the lower control arm to lift it and help the UCA ball joint slide through the spindle.
- Place the factory castle nut back onto the ball joint and tighten it to 81 lb-ft, tightening slightly more as needed to expose the hole for the cotter pin.
- Reinstall the cotter pin.
- Place the sway bar back into place (if you have completed the other side) and tighten the 17mm nut to 52 lb-ft.
- Tighten the 12mm bolt for the brake line bracket to 9 lb-ft, and the 10mm bolt for the ABS line to 9 lb-ft.
Rear Suspension Installation
Disconnecting the Rear Suspension
To place the spacer between the axle and the leaf spring, you need to separate them. This can be done by supporting the axle with jack stands and lifting the body of the truck higher.
Step 6: Remove U-Bolts
- Ensure the vehicle is securely on jack stands.
- Remove the four 19mm U-bolt nuts located underneath the axle cradle. Wear eye protection.
- Remove the washers and lower the cradle off of the U-bolts.
- Lift the U-bolts up and over the leaf springs, being careful not to hit the brake lines.
 Disconnecting U-Bolt for Leveling Kit Install
Disconnecting the U-bolt during the leveling kit installation process on a Toyota Tacoma.
Step 7: Remove Shock Bolt & Separate Leaf from Axle
- Remove the 17mm lower shock mount bolt.
- Remove the 12mm brake line bracket bolt to prevent the brake lines from stretching.
- Raise the body and frame of the vehicle to pull the leaf springs away from the axle. Use a tall floor jack placed on the receiver hitch.
 Spacer Lift Install on Toyota Tacoma
Installing a spacer lift on a Toyota Tacoma, showing the separation of the leaf spring and axle.
Step 8: Install Rear Spacer Block
- Slide the spacer between the leaf springs and axle, ensuring the centering pin on the spacer drops into the hole in the leaf spring perch.
- Lower the truck back down and align the centering pins on the leaf springs to fall into the hole in the spacers. Use a pry bar to align the pins if necessary.
 Rear Spacer Block for Lifting Rear End in Toyota Tacoma
Installing the rear spacer block for lifting the rear end of a Toyota Tacoma.
Step 9: Install New U-Bolts
- Place the longer U-bolts over the top of the leaf springs and slide them next to the axle, being careful not to hit the brake lines.
- Use the provided flat washers, lock washers, and new nuts for reassembly.
- Ensure the bump stops are in place and the U-bolts are over the top and held in by the clips.
- Tighten the U-bolts in a crossing pattern, tightening them evenly. Ensure the cradle is level.
- Tighten the 19mm U-bolt nuts to 52 lb-ft.
- Reinstall the stock shocks, using the old hardware, and tighten the 17mm bolt to 43 lb-ft.
- Reinstall the 12mm brake line bracket bolts and tighten to 9 lb-ft.
- Double-check that everything is tightened and lower the truck down to the ground.
7. Potential Issues and Considerations During Installation
While installing a leveling kit is a relatively straightforward process, there are a few potential issues and considerations to keep in mind:
- UCA Upgrade: For a 3-inch lift, you may need to upgrade your upper control arms to bring the vehicle back to stock wheel alignment specifications.
- Bump Stops: Consider getting new bump stops for the front, as the stock ones may not be sufficient.
- Extended Brake Lines: Extended brake lines are recommended, as the stock lines can get very tight at full droop.
- Differential Drop Kit: A differential drop kit is also a good idea to maintain proper driveline angles.
- Stock Shocks: The stock shocks may not be long enough for the rear lift, so consider upgrading to longer shocks like the Bilstein 5100.
8. After the Installation: What to Expect and Check
After installing the leveling kit, it’s important to inspect the vehicle for any potential issues and ensure everything is functioning correctly. Here are some things to check:
- Alignment: Get a professional wheel alignment to ensure proper handling and tire wear.
- Brake Lines: Check the brake lines for any signs of stretching or damage.
- Driveline Angles: Inspect the driveline angles to ensure they are within acceptable limits.
- Suspension Components: Check all suspension components for proper installation and tightness.
- Test Drive: Take the vehicle for a test drive to check for any unusual noises or vibrations.
According to customer feedback, 90% of Toyota Tacoma owners recommend getting a professional alignment after installing a leveling kit to ensure optimal performance and safety.
9. How Much Does It Cost to Install a Leveling Kit on a Toyota Tacoma?
The cost of installing a leveling kit on your Toyota Tacoma can vary depending on several factors, including:
- Cost of the Leveling Kit: Leveling kits can range in price from around $100 to $500, depending on the brand, quality, and features.
- Professional Installation Costs: If you choose to have a professional install the leveling kit, labor costs can range from $200 to $600, depending on the shop and the complexity of the installation.
- Additional Parts and Services: You may need to factor in the cost of additional parts and services, such as an alignment, new shocks, or extended brake lines.
Estimated Total Cost:
- DIY Installation: $100 – $500 (for the leveling kit)
- Professional Installation: $300 – $1100 (including the leveling kit and labor)
10. Why Choose Miller Toyota in Boise for Your Tacoma Leveling Kit Needs?
At millertoyota.net, we’re committed to providing Toyota owners in the Boise area with exceptional service and expertise. Here’s why you should choose us for your Tacoma leveling kit needs:
- Expert Technicians: Our certified technicians have extensive experience working on Toyota vehicles and are skilled in installing leveling kits and other modifications.
- Quality Parts: We use only high-quality leveling kits and components from trusted brands.
- Competitive Pricing: We offer competitive pricing on both leveling kits and installation services.
- Customer Satisfaction: We’re dedicated to providing excellent customer service and ensuring your satisfaction.
- Convenient Location: Our dealership is conveniently located in Boise, making it easy for you to get the service you need.
FAQ: Leveling Kits on Toyota Tacoma
1. Will a leveling kit affect my Toyota Tacoma’s ride quality?
A leveling kit can slightly affect your Tacoma’s ride quality, depending on the type of kit and the condition of your existing suspension. In most cases, the change is minimal.
2. Can I install a leveling kit myself, or should I hire a professional?
If you have experience working on vehicles and are comfortable with basic tools, you can install a leveling kit yourself. However, professional installation is recommended if you’re not confident in your abilities.
3. Will a leveling kit void my Toyota Tacoma’s warranty?
Installing a leveling kit may void certain parts of your Tacoma’s warranty, specifically those related to the suspension. However, it’s unlikely to void the entire warranty. Check with your dealer for more information.
4. How much does a leveling kit typically cost for a Toyota Tacoma?
Leveling kits for Toyota Tacomas typically range in price from $100 to $500, depending on the brand, quality, and features.
5. What size tires can I fit on my Toyota Tacoma after installing a leveling kit?
The tire size you can fit after installing a leveling kit depends on the specific kit and your Tacoma’s configuration. However, most leveling kits allow you to fit tires that are 1-2 inches larger in diameter than stock.
6. Will a leveling kit affect my Toyota Tacoma’s gas mileage?
A leveling kit can slightly affect your Tacoma’s gas mileage, primarily due to the increased ride height and the potential for larger, heavier tires.
7. Is a leveling kit the same as a lift kit?
No, a leveling kit is not the same as a lift kit. A leveling kit is designed to raise the front of your vehicle to match the height of the rear, while a lift kit is designed to raise the entire vehicle.
8. What are the benefits of installing a leveling kit on my Toyota Tacoma?
The benefits of installing a leveling kit on your Toyota Tacoma include improved aesthetics, larger tire fitment, increased ground clearance, and cost-effectiveness.
9. How long does it take to install a leveling kit on a Toyota Tacoma?
The installation time for a leveling kit on a Toyota Tacoma can vary depending on your experience and the complexity of the kit. However, most installations take between 4 and 8 hours.
10. What should I do after installing a leveling kit on my Toyota Tacoma?
After installing a leveling kit, it’s important to get a professional wheel alignment, check the brake lines for any signs of stretching or damage, inspect the driveline angles, check all suspension components for proper installation and tightness, and take the vehicle for a test drive.
Ready to take your Toyota Tacoma to the next level? Visit millertoyota.net today to explore our selection of leveling kits and schedule your installation service. Our team is here to help you achieve the perfect look and performance for your Tacoma.
Miller Toyota
Address: 208 N Maple Grove Rd, Boise, ID 83704, United States
Phone: +1 (208) 376-8888
Website: millertoyota.net