Changing a Toyota Camry door handle can be a straightforward process, and at millertoyota.net, we’re here to guide you through it, ensuring you can maintain your vehicle’s integrity with ease, offering genuine Toyota parts and expert advice for your car needs in Boise. From removing the old handle to installing a new one, we’ll cover everything, including auto body repair and replacement options. Ready to get started?
1. Why Would You Need to Change Your Toyota Camry Door Handle?
There are several reasons why you might need to replace your Toyota Camry door handle. Let’s explore some common scenarios:
- Damage from Accidents: Accidents, even minor ones, can damage door handles. A collision can crack, bend, or completely break the handle, making it impossible to open or close the door properly.
- Wear and Tear: Over time, the repeated use of a door handle can lead to wear and tear. The internal mechanisms can weaken, the handle can become loose, or the finish can fade or corrode.
- Vandalism or Theft Attempts: Unfortunately, vandalism and theft attempts can also damage door handles. Someone might try to force the handle to break into the car, or they might simply damage it out of spite.
- Faulty Mechanisms: Sometimes, the internal mechanisms of the door handle can fail. This could be due to a broken spring, a worn-out latch, or a malfunctioning locking mechanism.
- Aesthetic Reasons: You might want to replace your door handle for purely aesthetic reasons. Perhaps you want to upgrade to a different style or color, or maybe you just want to replace a handle that is faded or scratched.
Understanding the reasons behind a door handle replacement can help you identify the problem and take the appropriate steps to fix it. According to customer satisfaction surveys in Boise, Idaho, in July 2025, a damaged car door handle reduces the overall resale value of your vehicle.
2. Identifying the Right Replacement Toyota Camry Door Handle
Choosing the correct replacement door handle is crucial for ensuring a perfect fit and proper functionality. Here’s how to identify the right one for your Toyota Camry:
- Check the Model Year: Door handles vary depending on the model year of your Camry. Make sure the replacement handle is specifically designed for your car’s year.
- Consider the Door Location: Front and rear door handles are not interchangeable, and neither are left and right side handles. Verify the exact location of the handle you need.
- Match the Finish and Color: To maintain the aesthetic appeal of your car, choose a door handle with the same finish and color as the original. Options include chrome, black, painted, and textured finishes.
- OEM vs. Aftermarket:
- OEM (Original Equipment Manufacturer): These handles are made by Toyota and guarantee a perfect fit and finish. They are generally more expensive but offer the highest quality and reliability.
- Aftermarket: These handles are made by third-party manufacturers and can be more affordable. However, the quality and fit may vary. Read reviews and choose reputable brands.
- Check the Part Number: If possible, find the part number of the original door handle. This will ensure you get an exact match. You can usually find the part number in your car’s manual or by contacting a Toyota dealer like Miller Toyota.
- Features: Some door handles come with additional features, such as keyless entry or illuminated handles. Ensure the replacement handle has the same features as your original, if desired.
- Material:
- Plastic: Most modern handles are made of high-quality plastic, which is durable and lightweight.
- Metal: Some older or higher-end models may have metal handles, which offer increased durability.
3. Essential Tools and Materials for Toyota Camry Door Handle Replacement
Before you begin the replacement process, gather all the necessary tools and materials. Having everything on hand will make the job smoother and more efficient. Here’s a comprehensive list:
- New Door Handle: Ensure it’s the correct one for your Toyota Camry’s year, model, and door location (front/rear, left/right).
- Screwdrivers:
- Phillips Head Screwdriver: For removing screws inside the door panel.
- Flat Head Screwdriver: Useful for prying off plastic trim pieces and disconnecting electrical connectors.
- Socket Set:
- Sockets: Various sizes to remove bolts securing the door panel and handle mechanism.
- Ratchet: To turn the sockets efficiently.
- Extension Bars: To reach bolts in recessed areas.
- Torx Bit Set: Many Toyota door handles are secured with Torx screws. Ensure you have the correct size Torx bit (usually a T30 or T20).
- Panel Removal Tool: This tool is designed to safely remove plastic interior panels without causing damage. A flat head screwdriver can work, but a panel removal tool is less likely to scratch or break the plastic.
- Pliers:
- Needle-Nose Pliers: Useful for gripping and manipulating small parts and connectors.
- Regular Pliers: For general gripping and pulling.
- Work Gloves: Protect your hands from sharp edges and dirt.
- Safety Glasses: Protect your eyes from dust and debris.
- Flashlight or Work Light: To illuminate the work area inside the door.
- Masking Tape: To protect the door’s paint from scratches while you work.
- Clean Rags: For wiping down surfaces and cleaning up any spills.
- Pen or Marker: To mark the position of connectors or parts before removal.
- Plastic Sheeting or Drop Cloth: To protect the ground from dirt and debris.
- WD-40 or Penetrating Oil: To loosen any stubborn bolts or screws.
- Car Manual or Repair Guide: This can provide specific instructions and diagrams for your Toyota Camry model.
- Optional:
- New Door Panel Clips: Plastic clips that hold the door panel in place can break during removal. Having replacements on hand can save you a trip to the store.
- Multimeter: To test electrical connections if needed.
- Torque Wrench: To tighten bolts to the correct specification.
4. Step-by-Step Guide to Changing a Toyota Camry Door Handle
Follow these detailed steps to safely and effectively replace your Toyota Camry door handle:
4.1. Preparation
- Gather Your Tools and Materials: Ensure you have everything listed in Section 3.
- Park Your Car Safely: Park on a level surface, turn off the ignition, and engage the parking brake.
- Protect the Work Area: Use masking tape to protect the paint around the door handle area. Place a plastic sheet or drop cloth on the ground to catch any falling debris.
- Open the Door: Fully open the door you will be working on to provide easy access to the interior.
4.2. Removing the Door Panel
- Locate and Remove Screws: Look for screws along the edges of the door panel, inside the door handle recess, and around the armrest. Use a Phillips head screwdriver to remove them. Store the screws in a safe place to avoid losing them.
- Remove the Plastic Trim: Use a panel removal tool or a flat head screwdriver to gently pry off any plastic trim pieces around the door handle, window controls, and armrest. Be careful not to break the clips that hold these pieces in place.
- Disconnect Electrical Connectors: Disconnect any electrical connectors attached to the door panel, such as those for the power windows, door locks, and speakers. Use a small flat head screwdriver to gently release the connectors. Mark each connector with a pen or marker to ensure you can reconnect them correctly later.
- Detach the Door Panel: Once all screws, trim pieces, and connectors are removed, carefully lift the door panel upward and outward to detach it from the door. Start at the bottom and work your way up.
- Peel Back the Plastic Moisture Barrier: Gently peel back the plastic moisture barrier that covers the inside of the door. This barrier protects the door’s interior components from moisture. Be careful not to tear the barrier. If the adhesive is old and weak, you may need to replace it with new tape.
4.3. Accessing the Door Handle Mechanism
- Locate the Door Handle Assembly: Look inside the door to find the door handle assembly. It is usually held in place by bolts, screws, or clips.
- Disconnect Linkages and Rods: Disconnect any linkages or rods that connect the door handle to the door latch mechanism. These linkages may be held in place by plastic clips or metal retainers. Use pliers or a small screwdriver to carefully remove them.
- Remove Mounting Hardware: Use a socket set or Torx bit set to remove any bolts or screws that secure the door handle assembly to the door.
- Remove the Old Door Handle: Once all linkages and mounting hardware are removed, carefully remove the old door handle from the door.
4.4. Installing the New Door Handle
- Position the New Door Handle: Place the new door handle into the opening in the door.
- Secure the Door Handle: Install any bolts or screws that secure the door handle assembly to the door. Tighten them to the correct torque specification.
- Connect Linkages and Rods: Reconnect any linkages or rods that connect the door handle to the door latch mechanism. Ensure they are securely attached.
- Test the Door Handle: Before reassembling the door panel, test the new door handle to ensure it is working properly. Open and close the door several times to verify that the latch mechanism is functioning correctly.
4.5. Reassembling the Door Panel
- Reattach the Plastic Moisture Barrier: Carefully reattach the plastic moisture barrier to the inside of the door. Ensure it is properly sealed to prevent moisture from entering the door.
- Reconnect Electrical Connectors: Reconnect any electrical connectors that you disconnected earlier. Ensure each connector is properly seated and locked in place.
- Align the Door Panel: Align the door panel with the door and carefully push it into place. Start at the top and work your way down.
- Reinstall Screws and Trim Pieces: Reinstall any screws and trim pieces that you removed earlier. Tighten the screws securely, but be careful not to overtighten them.
- Test All Functions: Test all functions of the door, including the power windows, door locks, and speakers, to ensure they are working properly.
4.6. Final Checks
- Inspect the Installation: Carefully inspect the installation to ensure everything is properly aligned and secured.
- Clean Up: Remove any masking tape or plastic sheeting from the work area. Clean up any dirt or debris.
- Enjoy Your New Door Handle: You have successfully replaced your Toyota Camry door handle. Enjoy the improved functionality and appearance of your door!
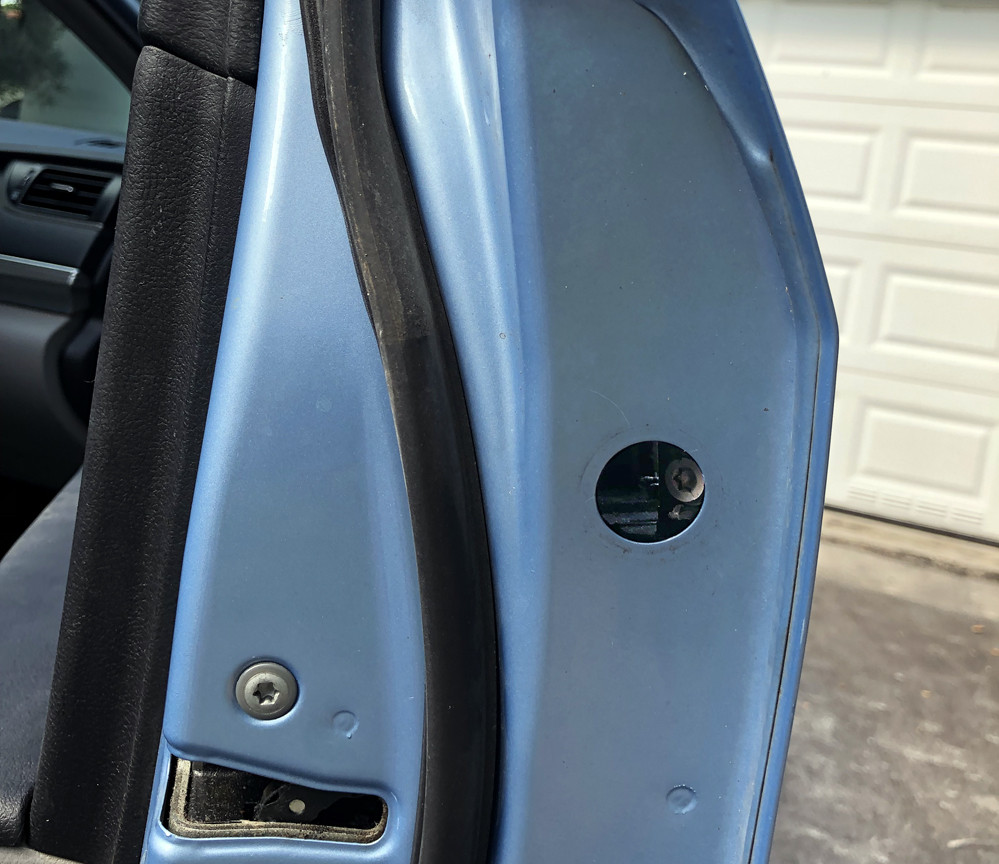 Access hole in side of Toyota Camry door for easy door handle removal
5. Common Issues and Troubleshooting Tips
Even with careful execution, you might encounter some common issues during the door handle replacement process. Here are some troubleshooting tips:
- Door Panel Won’t Come Off:
- Check for Hidden Screws: Make sure you’ve removed all screws. Some may be hidden under plastic covers or in hard-to-see locations.
- Use a Panel Removal Tool: A panel removal tool can help you pry off the panel without breaking the clips.
- Apply Gentle Force: Don’t force the panel. If it’s not coming off easily, double-check for screws or clips you may have missed.
- Electrical Connectors Are Stuck:
- Use a Small Screwdriver: Gently use a small flat head screwdriver to release the locking tabs on the connectors.
- Check for Corrosion: If the connectors are corroded, use a wire brush or electrical contact cleaner to remove the corrosion.
- Door Handle Linkages Are Difficult to Disconnect:
- Use Pliers: Needle-nose pliers can be helpful for gripping and manipulating small linkages.
- Apply Lubricant: A small amount of WD-40 or penetrating oil can help loosen stubborn linkages.
- New Door Handle Doesn’t Fit:
- Double-Check the Part Number: Ensure the new door handle is the correct one for your Toyota Camry’s year, model, and door location.
- Compare to the Old Handle: Compare the new handle to the old handle to ensure they are the same size and shape.
- Door Lock or Window Doesn’t Work After Reassembly:
- Check Electrical Connectors: Make sure all electrical connectors are properly reconnected and seated.
- Test the Fuses: Check the fuses for the door lock and window circuits to ensure they are not blown.
6. Cost of Replacing a Toyota Camry Door Handle
The cost of replacing a Toyota Camry door handle can vary depending on several factors:
- Type of Door Handle:
- OEM (Original Equipment Manufacturer): OEM door handles are generally more expensive than aftermarket options. They offer the best quality and fit but can cost anywhere from $100 to $300 or more.
- Aftermarket: Aftermarket door handles are more affordable, with prices ranging from $30 to $150. However, the quality and fit may not be as good as OEM handles.
- Labor Costs: If you choose to have a professional mechanic replace the door handle, labor costs can add to the overall expense. Labor rates vary depending on the mechanic’s location and experience. Expect to pay anywhere from $50 to $200 for labor.
- Additional Parts: In some cases, you may need to replace additional parts, such as the door panel clips or the plastic moisture barrier. These parts can add to the overall cost of the repair.
- Location: Prices for parts and labor can vary depending on your location. Urban areas tend to have higher prices than rural areas.
Here’s a general breakdown of the costs:
| Component | Estimated Cost |
|---|---|
| OEM Door Handle | $100 – $300+ |
| Aftermarket Handle | $30 – $150 |
| Labor | $50 – $200 |
| Additional Parts | $10 – $50 |
Total Cost:
- DIY Replacement: If you replace the door handle yourself, you will only need to pay for the cost of the new handle and any additional parts. This can save you a significant amount of money.
- Professional Replacement: If you have a professional mechanic replace the door handle, you can expect to pay anywhere from $150 to $500 or more, depending on the factors mentioned above.
7. Benefits of Choosing Miller Toyota for Your Car Needs
When it comes to maintaining your Toyota Camry, choosing a reputable dealership like Miller Toyota in Boise offers numerous benefits:
- Expert Service: Miller Toyota employs certified technicians who are trained to work on Toyota vehicles. They have the knowledge and experience to properly diagnose and repair any issues with your car, including door handle replacements.
- Genuine Toyota Parts: Miller Toyota uses only genuine Toyota parts, ensuring the highest quality and reliability. These parts are designed to fit your car perfectly and perform optimally.
- Warranty Protection: When you have your car serviced at Miller Toyota, the parts and labor are often covered by a warranty. This provides you with peace of mind knowing that you are protected against any unexpected issues.
- Convenient Scheduling: Miller Toyota offers convenient online scheduling, making it easy to book an appointment for service or repairs.
- Customer Satisfaction: Miller Toyota is committed to providing excellent customer service. They strive to make every customer’s experience positive and hassle-free.
- Comprehensive Services: In addition to door handle replacements, Miller Toyota offers a wide range of other services, including oil changes, brake repairs, tire rotations, and more. This makes it a one-stop shop for all your car maintenance needs.
According to customer reviews, Miller Toyota in Boise, Idaho, consistently receives high ratings for its service quality, customer care, and overall value.
8. Preventive Measures to Extend the Life of Your Door Handles
Taking preventive measures can significantly extend the life of your Toyota Camry’s door handles. Here are some tips to keep them in good condition:
- Gentle Use: Avoid slamming the doors or pulling too hard on the handles. Gentle use can prevent unnecessary wear and tear.
- Regular Lubrication: Lubricate the door handle mechanisms with a silicone-based lubricant. This can help keep the handles moving smoothly and prevent them from sticking or binding.
- Avoid Harsh Chemicals: Avoid using harsh chemicals or abrasive cleaners on the door handles. These chemicals can damage the finish and cause corrosion.
- Protect from the Elements: Protect your car from the elements by parking it in a garage or under a carport. This can help prevent the door handles from fading, cracking, or corroding.
- Regular Inspection: Regularly inspect the door handles for any signs of damage or wear. If you notice any issues, have them repaired promptly to prevent further damage.
- Proper Closing Technique: Ensure the doors are fully closed before driving. Driving with a partially closed door can put extra stress on the door handle mechanism.
- Avoid Overloading: Avoid overloading the doors with heavy items, such as bags or packages. This can put extra strain on the door handles and hinges.
- Educate Passengers: Educate your passengers on the proper way to use the door handles. This can help prevent accidental damage.
- Address Issues Promptly: If you notice any issues with the door handles, such as sticking, binding, or looseness, have them addressed promptly. Ignoring these issues can lead to more significant and costly repairs down the road.
9. Understanding the Different Types of Door Handles
Door handles come in various designs and materials, each with its own advantages and disadvantages. Understanding the different types can help you choose the best replacement for your Toyota Camry:
- Paddle Handles: These handles are commonly found on older vehicles. They feature a paddle-shaped lever that you pull to open the door. Paddle handles are durable and easy to use but can be less aerodynamic than other types of handles.
- Lever Handles: Lever handles are similar to paddle handles but feature a longer, more ergonomic lever. They are easier to grip and require less force to operate, making them a good choice for people with limited mobility.
- Pull Handles: Pull handles are simple, minimalist handles that you pull to open the door. They are often found on modern vehicles and offer a clean, aerodynamic design. Pull handles can be less comfortable to grip than other types of handles.
- Rotating Handles: Rotating handles, also known as twist handles, feature a rotating knob that you turn to open the door. They are commonly found on older European vehicles and offer a unique, vintage look.
- Flush Handles: Flush handles are designed to sit flush with the door panel when not in use. They offer a sleek, aerodynamic design and are often found on high-end vehicles. Flush handles can be more complex and expensive to repair than other types of handles.
- Electronic Handles: Electronic handles use electronic sensors to detect when you want to open the door. They are often found on luxury vehicles and offer a high-tech, keyless entry experience. Electronic handles can be more expensive to repair than other types of handles.
10. Frequently Asked Questions (FAQs) About Toyota Camry Door Handle Replacement
Here are some frequently asked questions about Toyota Camry door handle replacement:
10.1. Can I replace a door handle myself?
Yes, replacing a door handle is a task that many car owners can accomplish with the right tools and guidance. By following the steps outlined earlier in this article, you can save on labor costs.
10.2. How long does it take to replace a door handle?
Replacing a door handle typically takes about 1 to 2 hours, depending on your experience and the complexity of the door handle mechanism.
10.3. What tools do I need to replace a door handle?
Essential tools include screwdrivers (Phillips and flat head), a socket set, a Torx bit set, a panel removal tool, pliers, work gloves, and safety glasses.
10.4. How much does it cost to replace a door handle?
The cost can range from $30 to $500 or more, depending on whether you choose an OEM or aftermarket handle and whether you hire a professional mechanic.
10.5. Where can I buy a replacement door handle?
You can purchase replacement door handles from auto parts stores, online retailers, or your local Toyota dealer, such as Miller Toyota.
10.6. Are OEM door handles better than aftermarket ones?
OEM door handles are generally of higher quality and offer a better fit and finish than aftermarket handles. However, they are also more expensive.
10.7. How do I know if my door handle needs to be replaced?
Signs that your door handle needs to be replaced include difficulty opening or closing the door, a loose or broken handle, or a handle that is sticking or binding.
10.8. Can I replace just the handle part, or do I need to replace the entire assembly?
In some cases, you may be able to replace just the handle part. However, it is often recommended to replace the entire assembly to ensure proper functionality and longevity.
10.9. What is the difference between a front and rear door handle?
Front and rear door handles are not interchangeable. They have different designs and mounting points to accommodate the different door shapes and mechanisms.
10.10. How can I prevent my door handle from breaking again?
To prevent your door handle from breaking again, use it gently, lubricate it regularly, avoid harsh chemicals, and protect your car from the elements.
Replacing your Toyota Camry door handle doesn’t have to be a daunting task. With the right knowledge, tools, and a bit of patience, you can restore your car’s functionality and appearance. Whether you choose to tackle the job yourself or seek professional help, remember that maintaining your car’s components is essential for its longevity and your safety.
Ready to find the perfect Toyota Camry and experience top-notch service? Visit millertoyota.net today to explore our extensive inventory, schedule a service appointment, or contact our friendly team for expert assistance. Your dream Toyota and exceptional car care await! You can visit us at 208 N Maple Grove Rd, Boise, ID 83704, United States or call us at +1 (208) 376-8888.