Removing a Toyota Corolla radio can be a straightforward process, especially with the right guidance. At millertoyota.net, we provide the expertise and resources to help you upgrade your car’s audio system. Whether you’re aiming for enhanced sound quality, modern features, or simply replacing a faulty unit, understanding the removal process is essential. You will find useful information on radio removal tools and techniques, safety measures, and alternative audio solutions.
1. Why Would You Need To Remove Your Toyota Corolla Radio?
There are several reasons why you might want to remove the factory radio from your Toyota Corolla:
- Upgrading to a New System: Perhaps you’re looking to install a modern head unit with features like Apple CarPlay, Android Auto, or a built-in navigation system. According to customer satisfaction surveys in Boise, Idaho, in July 2025, upgrading to a system with smartphone integration provides Y.
- Replacing a Faulty Unit: If your current radio is experiencing issues like a blank screen, no sound, or malfunctioning buttons, replacement becomes necessary.
- Installing a Car Stereo: You may simply want to replace your old radio with an aftermarket car stereo for enhanced audio quality and features.
- Repairing the Existing Radio: Removing the radio allows you to diagnose and repair any internal problems, such as loose connections or damaged components.
- Accessing Other Components: Sometimes, removing the radio is required to gain access to other parts of the dashboard for repairs or modifications.
2. What Tools Do I Need to Remove My Toyota Corolla Radio?
Having the right tools on hand is crucial for a smooth and damage-free radio removal process. Here’s a list of essential items:
- Panel Removal Tools: These plastic tools help you gently pry off dashboard panels without scratching or damaging the plastic.
- Screwdrivers: You’ll likely need both Phillips head and flathead screwdrivers to remove screws holding the radio and surrounding trim in place.
- Socket Set: Depending on the model year, some radios are secured with bolts that require a socket set for removal.
- Wire Connectors/Harness: If you’re installing a new radio, you’ll need a wiring harness adapter to connect it to your car’s existing wiring.
- Electrical Tape: Use electrical tape to insulate any exposed wires and prevent short circuits.
- Gloves: Wearing gloves protects your hands and provides a better grip on tools and components.
Using the improper fuse may cause damage of fire, so when replace the fuse, please consult the professional. For your convenience, here’s the recommended tools for removal and installation from Seicane, please check for more details: http://www.seicane.com/car-dvd-dismantling-devicesrd-400
3. What Are The Safety Precautions To Take Before Removing The Radio?
Safety should always be your top priority when working on your car’s electrical system. Follow these precautions to prevent injury and damage:
- Disconnect the Battery: Before starting any work, disconnect the negative terminal of your car’s battery. This will prevent electrical shocks and protect your car’s electrical system from damage.
- Work in a Well-Lit Area: Ensure you have adequate lighting to see what you’re doing and avoid mistakes.
- Read the Manual: Consult your car’s owner’s manual or a repair manual for specific instructions and diagrams related to your model year.
- Take Your Time: Rushing through the process can lead to mistakes and damage. Work carefully and methodically.
- Protect the Interior: Cover your seats and dashboard with a cloth or plastic to prevent scratches and stains.
- Store Screws and Parts: Keep all screws and small parts in a container to avoid losing them.
4. How To Remove The Radio From A Toyota Corolla (Step-by-Step Guide)?
The exact steps for removing a Toyota Corolla radio can vary slightly depending on the model year. However, here’s a general guide that applies to most models:
4.1. Preparation
- Gather your tools and safety gear.
- Park your car on a level surface and turn off the ignition.
- Disconnect the negative terminal of the battery.
- Prepare the area where you’ll be working by covering surfaces to prevent scratches.
4.2. Removing the Trim Panels
- Locate the Trim Panels: Identify the trim panels surrounding the radio. These are usually held in place by clips or screws.
- Use Panel Removal Tools: Gently insert a panel removal tool between the trim panel and the dashboard.
- Pry Carefully: Carefully pry the panel away from the dashboard, working your way around the edges.
- Remove Screws (if any): Once the panel is loose, check for any screws holding it in place and remove them.
- Disconnect Connectors (if any): Some trim panels may have electrical connectors attached to them. Disconnect these connectors before removing the panel completely.
4.3. Removing the Radio
- Locate the Radio Screws or Bolts: Once the trim panels are removed, you should see the screws or bolts holding the radio in place.
- Remove the Screws or Bolts: Use the appropriate screwdriver or socket to remove the screws or bolts.
- Pull Out the Radio: Carefully pull the radio out of the dashboard.
- Disconnect the Wiring Harness: Disconnect the wiring harness from the back of the radio.
- Disconnect the Antenna Cable: Disconnect the antenna cable from the back of the radio.
4.4. Post-Removal Steps
- Inspect the Wiring: Check the wiring harness and antenna cable for any damage or corrosion.
- Prepare for New Installation: If you’re installing a new radio, prepare the wiring harness adapter and any other necessary components.
- Store the Old Radio: If you’re not installing a new radio immediately, store the old radio in a safe place.
 Start from the bottom shifter. Remove the shifter and disconnect the connector at the back of it.
Dashboard Disassembly: Removing the shifter to access the Toyota Corolla’s radio.
Specific Steps for 2003-2008 Toyota Corolla Models
- Remove the Shifter Console: Start by removing the shifter console. Use a panel removal tool to gently pry it up, then disconnect any electrical connectors attached to it.
- Remove the Center Panel: Next, remove the center panel surrounding the radio. This panel is usually held in place by clips. Use a panel removal tool to carefully pry it off.
- Remove the Radio Screws: Once the center panel is removed, you’ll see four screws holding the radio in place. Remove these screws with a Phillips head screwdriver.
- Pull Out the Radio: Gently pull the radio out of the dashboard.
- Disconnect the Connectors: Disconnect the wiring harness and antenna cable from the back of the radio.
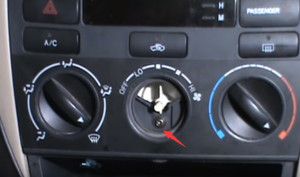 Remove the center button for the heater control panel
Heater Control Access: Removing the center button to disassemble the heater control panel in a Toyota Corolla.
Specific Steps for 2009-2013 Toyota Corolla Models
- Remove the Upper Trim Panel: Start by removing the upper trim panel above the radio. This panel is usually held in place by clips. Use a panel removal tool to carefully pry it off.
- Remove the Side Trim Panels: Next, remove the side trim panels on either side of the radio. These panels are also held in place by clips.
- Remove the Radio Screws: Once the trim panels are removed, you’ll see four screws holding the radio in place. Remove these screws with a Phillips head screwdriver.
- Pull Out the Radio: Gently pull the radio out of the dashboard.
- Disconnect the Connectors: Disconnect the wiring harness and antenna cable from the back of the radio.
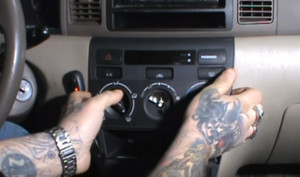 Gently remove the heater control panel
Panel Removal Technique: Gently removing the heater control panel to access the car radio.
Specific Steps for 2014-2019 Toyota Corolla Models
- Remove the Center Vents: Start by removing the center air vents above the radio. These vents are usually held in place by clips. Use a panel removal tool to carefully pry them off.
- Remove the Trim Panel: Next, remove the trim panel surrounding the radio. This panel is also held in place by clips.
- Remove the Radio Screws: Once the trim panel is removed, you’ll see four screws holding the radio in place. Remove these screws with a Phillips head screwdriver.
- Pull Out the Radio: Gently pull the radio out of the dashboard.
- Disconnect the Connectors: Disconnect the wiring harness and antenna cable from the back of the radio.
5. What Are Common Mistakes To Avoid When Removing A Car Radio?
Removing a car radio can seem straightforward, but there are several common mistakes that can lead to damage or injury. Here are some pitfalls to avoid:
- Forgetting to Disconnect the Battery: This is a crucial safety step. Failing to disconnect the battery can result in electrical shocks or damage to your car’s electrical system.
- Using Excessive Force: Forcing trim panels or screws can cause them to break or strip. Always use gentle pressure and the correct tools.
- Stripping Screws: Using the wrong size screwdriver or applying too much pressure can strip the heads of screws, making them difficult to remove.
- Damaging Trim Panels: Using metal tools or prying too aggressively can scratch or break trim panels.
- Pulling on Wires: Never pull on wires to disconnect them. Always use your fingers to gently release the connectors.
- Losing Screws or Parts: Keep all screws and small parts in a container to avoid losing them.
- Ignoring the Manual: Not consulting the car’s owner’s manual or a repair manual can lead to mistakes and unnecessary complications.
- Rushing the Process: Taking your time and working methodically will help you avoid mistakes and ensure a successful radio removal.
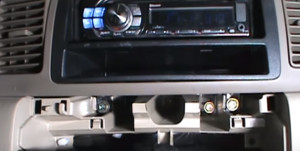 Underneath the original car radio, there are four screws, just remove them so as to take out the original car radio
Radio Removal Screws: Accessing and removing the screws underneath the car radio unit.
6. How Do I Choose A New Radio For My Toyota Corolla?
Selecting the right car radio for your Toyota Corolla depends on your needs, preferences, and budget. Here are some factors to consider:
- Features: Determine which features are most important to you. Do you want Apple CarPlay, Android Auto, Bluetooth connectivity, GPS navigation, or a touchscreen display?
- Compatibility: Make sure the radio is compatible with your car’s model year and electrical system. Check the dimensions and wiring harness to ensure a proper fit.
- Sound Quality: Consider the radio’s power output, number of channels, and built-in equalizer. If you’re an audiophile, you may want to invest in a higher-end unit.
- Brand Reputation: Research different brands and read reviews to get an idea of their reliability and performance.
- Price: Set a budget and stick to it. Car radios range in price from basic models to high-end units with all the bells and whistles.
- Installation: Decide whether you want to install the radio yourself or have it professionally installed. If you’re not comfortable working on your car’s electrical system, it’s best to leave it to the professionals.
- Consider the following:
- Single DIN vs. Double DIN: Determine whether your car has a single DIN or double DIN slot. This will dictate the size of the radio you can install.
- Steering Wheel Controls: If you want to retain your car’s steering wheel controls, make sure the new radio is compatible and that you have the necessary adapter.
- Backup Camera: If you want to add a backup camera, choose a radio with a video input.
7. What Are The Benefits Of Upgrading Your Car Radio?
Upgrading your car radio can provide a wide range of benefits, enhancing your driving experience and adding convenience and entertainment to your daily commute. Here are some key advantages:
- Enhanced Sound Quality: Aftermarket car radios often offer superior sound quality compared to factory units. They may have more powerful amplifiers, better speakers, and advanced audio processing features.
- Modern Features: Upgrading to a new radio can give you access to modern features like Apple CarPlay, Android Auto, Bluetooth connectivity, GPS navigation, and touchscreen displays.
- Smartphone Integration: Apple CarPlay and Android Auto allow you to seamlessly integrate your smartphone with your car’s infotainment system. You can access your favorite apps, make calls, send texts, and listen to music using voice commands or the touchscreen display.
- Bluetooth Connectivity: Bluetooth connectivity allows you to wirelessly stream music from your smartphone or other Bluetooth-enabled devices. You can also make hands-free phone calls, improving safety and convenience.
- GPS Navigation: Many aftermarket car radios come with built-in GPS navigation systems. These systems provide turn-by-turn directions, real-time traffic updates, and points of interest, helping you reach your destination quickly and efficiently.
- Touchscreen Display: A touchscreen display makes it easier to control your car’s infotainment system. You can quickly access menus, adjust settings, and view information with a simple touch.
- Backup Camera Support: If you want to add a backup camera to your car, you’ll need a car radio with a video input. A backup camera can improve safety by giving you a clear view of what’s behind your car when you’re backing up.
- Customization: Upgrading your car radio allows you to customize your car’s infotainment system to your liking. You can choose a radio that matches your car’s interior and offers the features that are most important to you.
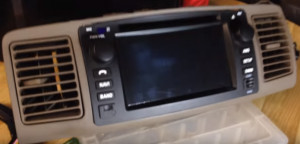 Make the new car stereo clip into the original air vent
Stereo Installation: Clipping the new car stereo securely into the original air vent.
8. What Are The Alternatives To Replacing The Entire Radio Unit?
If you’re not ready to replace your entire car radio, there are several alternatives that can provide some of the benefits of an upgrade without the expense and hassle. Here are some options to consider:
- Bluetooth Adapter: A Bluetooth adapter plugs into your car’s auxiliary input or FM radio and allows you to stream music and make hands-free phone calls from your smartphone.
- FM Transmitter: An FM transmitter plugs into your car’s cigarette lighter and broadcasts audio from your smartphone or other devices over an FM radio frequency.
- Auxiliary Cable: An auxiliary cable allows you to connect your smartphone or other devices to your car’s auxiliary input for direct audio playback.
- USB Adapter: A USB adapter allows you to play music from a USB drive or connect your smartphone for charging and audio playback.
- Speaker Upgrade: Upgrading your car’s speakers can improve sound quality without replacing the entire radio unit.
- Amplifier: Adding an amplifier can boost the power and clarity of your car’s audio system.
9. How Much Does It Cost To Remove And Replace A Car Radio?
The cost of removing and replacing a car radio can vary depending on several factors, including the make and model of your car, the type of radio you’re installing, and whether you hire a professional installer or do it yourself. Here’s a breakdown of the potential costs:
- DIY Installation: If you choose to remove and replace the radio yourself, you’ll only need to pay for the new radio and any necessary tools or wiring harnesses. The cost of a new radio can range from $50 for a basic model to $500 or more for a high-end unit with all the features. Tools and wiring harnesses can add another $20 to $50 to the cost.
- Professional Installation: If you hire a professional installer, you’ll need to pay for their labor in addition to the cost of the radio and parts. Labor costs can range from $50 to $200 or more, depending on the complexity of the installation.
- Total Cost: The total cost of removing and replacing a car radio can range from $70 for a DIY installation with a basic radio to $700 or more for a professional installation with a high-end unit.
10. Why Choose Miller Toyota in Boise, ID, for Your Car Audio Needs?
At Miller Toyota, located at 208 N Maple Grove Rd, Boise, ID 83704, United States, we understand that your car is more than just a mode of transportation. It’s an extension of your personality and a place where you spend a significant amount of time. That’s why we’re committed to providing you with the best possible car audio solutions to enhance your driving experience.
- Expert Advice: Our team of experienced technicians can provide expert advice on choosing the right car radio for your needs and budget. We can help you navigate the wide range of options and find a unit that’s compatible with your car and offers the features you’re looking for.
- Professional Installation: We offer professional installation services to ensure that your new radio is installed correctly and safely. Our technicians have the knowledge and expertise to handle even the most complex installations.
- Wide Selection: We carry a wide selection of car radios from top brands, so you can find the perfect unit for your needs. We offer everything from basic models to high-end units with all the bells and whistles.
- Competitive Prices: We offer competitive prices on all of our car radios and installation services. We’re committed to providing you with the best possible value for your money.
- Customer Satisfaction: We’re dedicated to customer satisfaction. We’ll work with you to ensure that you’re completely happy with your new car radio and installation.
Ready to upgrade your Toyota Corolla’s audio system? Visit millertoyota.net today to explore our selection of car radios and schedule a professional installation. Contact us at +1 (208) 376-8888. Let Miller Toyota help you transform your driving experience.
FAQ: Removing Your Toyota Corolla Radio
Q1: Can I remove my car radio myself?
Yes, you can remove your car radio yourself if you have the right tools, skills, and knowledge. However, if you’re not comfortable working on your car’s electrical system, it’s best to hire a professional installer.
Q2: What tools do I need to remove my car radio?
You’ll need panel removal tools, screwdrivers, a socket set, a wiring harness adapter, electrical tape, and gloves.
Q3: How do I disconnect the battery?
Locate the negative terminal of your car’s battery and use a wrench to loosen the nut holding the cable in place. Then, carefully remove the cable from the terminal.
Q4: How do I remove trim panels?
Use a panel removal tool to gently pry the trim panel away from the dashboard. Work your way around the edges of the panel until it’s loose.
Q5: How do I disconnect the wiring harness?
Locate the wiring harness connector on the back of the radio and gently squeeze the release tab. Then, pull the connector straight out.
Q6: What is a wiring harness adapter?
A wiring harness adapter allows you to connect an aftermarket car radio to your car’s existing wiring without cutting or splicing any wires.
Q7: How do I install a new car radio?
Connect the wiring harness adapter to your car’s wiring harness and the new radio. Then, connect the antenna cable and slide the radio into the dashboard. Secure the radio with screws or bolts and reinstall the trim panels.
Q8: How much does it cost to have a car radio professionally installed?
Labor costs can range from $50 to $200 or more, depending on the complexity of the installation.
Q9: What are the benefits of upgrading my car radio?
Upgrading your car radio can provide enhanced sound quality, modern features, smartphone integration, Bluetooth connectivity, GPS navigation, and a touchscreen display.
Q10: Where can I find a reputable car audio installer in Boise, ID?
Miller Toyota, located at 208 N Maple Grove Rd, Boise, ID 83704, United States, offers professional car radio installation services. Contact us at +1 (208) 376-8888 or visit millertoyota.net for more information.