Replacing the headlight assembly on your 2010 Toyota Tacoma is a straightforward process that can significantly improve your vehicle’s visibility and appearance, and millertoyota.net is here to guide you through every step. With the right tools and a bit of patience, you can handle this task yourself, saving money on professional service while ensuring your Tacoma looks its best with our genuine Toyota parts and expert advice.
1. Why Replace Your 2010 Toyota Tacoma Headlight Assembly?
Is it time to replace your 2010 Toyota Tacoma headlight assembly? A variety of factors can contribute to the need for a headlight replacement.
- Damage: Accidents, impacts from road debris, or even severe weather can crack or break your headlight assembly.
- Clouding or Yellowing: Over time, the plastic lens can become cloudy or yellowed due to UV exposure, reducing light output.
- Moisture Intrusion: Cracks or damaged seals can allow moisture to enter the assembly, causing condensation and potential damage to the bulb and electrical components.
- Upgrading: You might simply want to upgrade to a newer style or aftermarket headlight assembly for a fresh look.
No matter the reason, replacing your headlight assembly is essential for maintaining safe driving conditions, especially at night.
2. What Tools Do I Need To Replace My Headlight Assembly?
To successfully replace the headlight assembly on your 2010 Toyota Tacoma, gather these essential tools:
- New Headlight Assembly: Make sure it’s compatible with your 2010 Toyota Tacoma.
- Socket Set: A 10mm socket is crucial for removing the bolts holding the headlight in place.
- Ratchet: To turn the sockets and loosen/tighten bolts efficiently.
- Screwdrivers: Both Phillips head and flathead screwdrivers might be needed for various clips and screws.
- Pliers: For removing any stubborn clips or connectors.
- Gloves: To protect your hands.
- Safety Glasses: To protect your eyes.
- Optional Tools:
- Plastic Trim Removal Tools: These can help remove trim pieces without causing damage.
- Work Light: To provide better visibility, especially if working in a garage.
- Penetrating Oil: For loosening any rusted bolts.
Having these tools on hand will make the replacement process smoother and more efficient.
3. Step-By-Step Guide On Replacing Your 2010 Toyota Tacoma Headlight Assembly
Replacing your 2010 Toyota Tacoma headlight assembly is a task you can accomplish at home with the right tools and guidance. Follow these detailed steps for a successful replacement:
3.1. Preparation
- Gather Your Tools: Ensure you have all the necessary tools listed above.
- Park Your Tacoma: Park on a level surface and turn off the ignition.
- Disconnect the Battery (Optional): While not always necessary, disconnecting the negative battery terminal adds an extra layer of safety.
3.2. Removing the Old Headlight Assembly
- Remove the Grille:
- Open the hood.
- Locate the clips or screws holding the grille in place.
- Use a flathead screwdriver or plastic trim removal tool to carefully release the clips.
- Gently pull the grille forward to remove it.
- Remove the Surrounding Trim:
- Locate the lower trim piece under the headlight.
- Use a flathead screwdriver to depress the clip.
- Pull the trim piece towards the center of the vehicle to remove it.
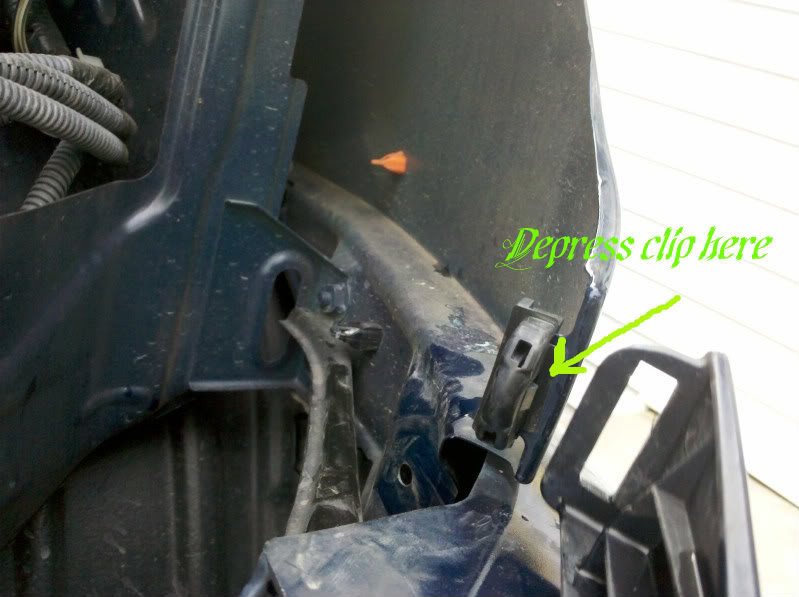 Headlight trim removal with screwdriver
- Remove the Bolts:
- Identify the bolts holding the headlight assembly in place (typically three 10mm bolts).
- Remove the two obvious upper bolts using a socket and ratchet.
- The third bolt is often hidden and requires a bit of maneuvering to access.
- For the hidden bolt, you might need a 1/4″ drive and a 10mm socket. It’s located above the visible bolt that holds the panels in place.
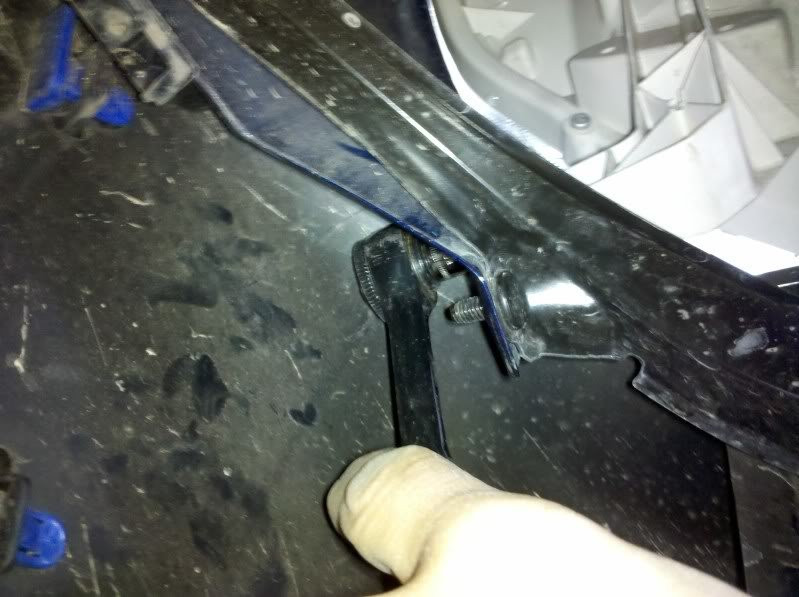 Location of headlight bolt
-
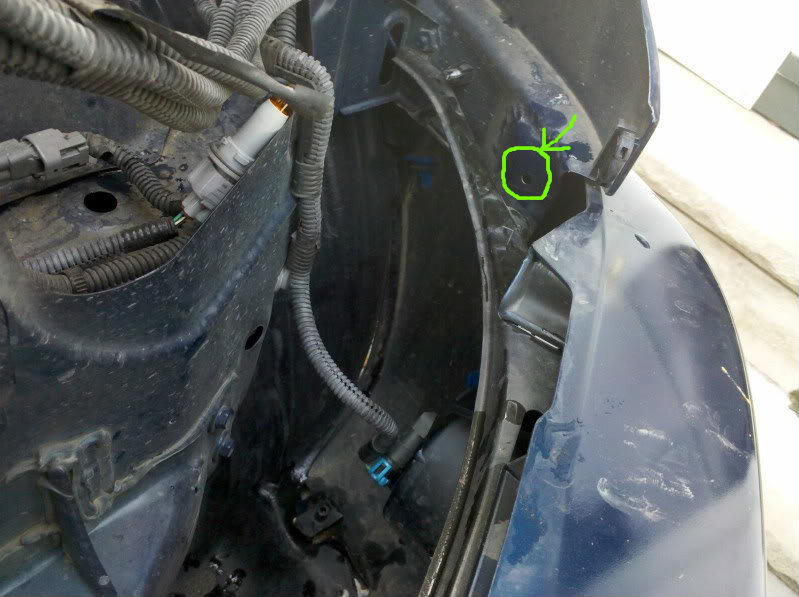
Remove the Fender Liner (If Necessary):
- To access the hidden bolt more easily, you can remove the lower portion of the fender liner.
- Remove the two 10mm/Phillips screws holding the fender liner in place.
- Bend the plastic liner up and out of the way.
-
Disconnect the Electrical Connectors:
- Reach behind the headlight assembly and disconnect the electrical connectors for the bulbs.
- Squeeze the connectors and gently pull them straight out.
-
Remove the Headlight Assembly:
- Carefully wiggle the headlight assembly out of its housing.
- Be mindful of any remaining clips or connectors.
 Headlight assembly removal
3.3. Installing the New Headlight Assembly
- Connect the Electrical Connectors:
- Attach the electrical connectors to the corresponding bulbs on the new headlight assembly.
- Ensure they click into place securely.
- Position the New Assembly:
- Carefully align the new headlight assembly with the mounting points.
- Reinstall the Bolts:
- Reinstall the three 10mm bolts, starting with the hidden one.
- Tighten the bolts, but don’t overtighten them.
- Reinstall the Fender Liner (If Removed):
- Reinstall the lower portion of the fender liner with the two 10mm/Phillips screws.
- Reinstall the Surrounding Trim:
- Align the lower trim piece under the headlight.
- Push it back into place until the clip secures it.
- Reinstall the Grille:
- Align the grille with the mounting points.
- Press the clips back into place or reinstall the screws.
- Reconnect the Battery (If Disconnected):
- Reconnect the negative battery terminal.
3.4. Testing and Final Checks
- Test the Headlights:
- Turn on the headlights to ensure they are working properly.
- Check both low beams and high beams.
- Check the Turn Signals:
- Activate the turn signals to ensure they are functioning correctly.
- Adjust the Headlight Alignment (If Necessary):
- If the headlight alignment is off, you may need to adjust it. Consult your owner’s manual for instructions or visit a professional service center like millertoyota.net.
- Final Inspection:
- Double-check all connections and ensure all parts are securely in place.
4. What Are The Benefits Of Replacing The Headlight Assembly Yourself?
Opting to replace your 2010 Toyota Tacoma headlight assembly yourself offers several advantages:
- Cost Savings: Avoid labor costs charged by professional mechanics.
- Convenience: Complete the replacement on your own schedule.
- Personal Satisfaction: Gain a sense of accomplishment from doing it yourself.
- Familiarity with Your Vehicle: Enhance your understanding of your Tacoma’s components.
However, it’s essential to weigh these benefits against the potential challenges, such as the need for specific tools and the risk of improper installation. If you’re unsure about any step, seeking professional assistance is always a wise decision.
5. Where To Buy A Replacement Headlight Assembly For Your 2010 Toyota Tacoma?
Finding the right replacement headlight assembly for your 2010 Toyota Tacoma is crucial for ensuring proper fit and performance. Here are several options to consider:
- millertoyota.net Parts Department: Offering genuine Toyota parts, millertoyota.net ensures the highest quality and perfect fit for your Tacoma. Our knowledgeable staff can assist you in selecting the correct assembly and answer any questions you may have.
- Local Auto Parts Stores: Stores like AutoZone, O’Reilly Auto Parts, and Advance Auto Parts carry a variety of aftermarket headlight assemblies. While these may be more affordable, ensure they meet quality standards and are compatible with your Tacoma.
- Online Retailers: Websites like Amazon and eBay offer a wide selection of headlight assemblies from various brands. Read customer reviews and verify the seller’s reputation before making a purchase.
- Junkyards: If you’re on a tight budget, consider visiting a local junkyard to find a used headlight assembly. However, inspect the assembly carefully for any damage or wear.
When choosing a replacement headlight assembly, prioritize quality, compatibility, and reliability to ensure optimal performance and safety.
6. How Much Does It Cost To Replace A Headlight Assembly On A 2010 Toyota Tacoma?
The cost of replacing a headlight assembly on your 2010 Toyota Tacoma can vary depending on several factors:
- Type of Assembly: Genuine Toyota parts from millertoyota.net typically cost more than aftermarket options.
- Brand: Different brands offer varying price points.
- Source: Purchasing from a dealership versus an online retailer can affect the price.
- Labor Costs (If Applicable): If you choose to have a professional mechanic perform the replacement, labor costs will add to the total expense.
Here’s a general breakdown of the potential costs:
- Headlight Assembly: $100 – $500+ (depending on the factors mentioned above)
- Labor Costs (If Applicable): $50 – $150+ (depending on the mechanic’s hourly rate and the complexity of the job)
Replacing the headlight assembly yourself can save you money on labor costs, but ensure you have the necessary tools and skills to complete the job properly.
7. Common Issues After Replacing Your 2010 Toyota Tacoma Headlight Assembly
Even after a successful replacement, you might encounter a few common issues. Here’s how to troubleshoot them:
- Headlight Not Working:
- Check the Bulb: Ensure the bulb is properly installed and not burnt out.
- Check the Connector: Make sure the electrical connector is securely attached.
- Check the Fuse: Inspect the headlight fuse in the fuse box and replace it if blown.
- Headlight Alignment Issues:
- Adjust the Headlight: Use the adjustment screws on the headlight assembly to adjust the beam’s direction.
- Consult a Professional: If you’re unable to align the headlight properly, visit a service center like millertoyota.net for assistance.
- Moisture Inside the Assembly:
- Check the Seal: Ensure the seal around the headlight assembly is intact.
- Dry It Out: Remove the headlight assembly and use a hairdryer to dry out the moisture.
- Apply Sealant: Apply a bead of silicone sealant around the edge of the assembly to prevent future moisture intrusion.
Addressing these issues promptly will ensure your new headlight assembly functions optimally and provides safe driving conditions.
8. What Are The Different Types Of Headlight Assemblies Available?
When replacing your 2010 Toyota Tacoma headlight assembly, you’ll encounter several types of options:
- Halogen:
- Description: Traditional headlights that use a tungsten filament to produce light.
- Pros: Affordable, readily available, and easy to replace.
- Cons: Less energy-efficient and shorter lifespan compared to other options.
- LED (Light Emitting Diode):
- Description: Modern headlights that use LEDs to produce bright, focused light.
- Pros: Energy-efficient, long-lasting, and offer a bright, white light output.
- Cons: More expensive than halogen headlights.
- HID (High-Intensity Discharge):
- Description: Headlights that use xenon gas to produce a bright, bluish-white light.
- Pros: Brighter and more energy-efficient than halogen headlights.
- Cons: Can be expensive and require a ballast to operate.
- Projector Headlights:
- Description: Headlights that use a lens to focus the light beam, providing a sharper and more concentrated light output.
- Pros: Improved visibility and a modern look.
- Cons: Can be more expensive than reflector headlights.
- Reflector Headlights:
- Description: Headlights that use a reflector to direct the light beam.
- Pros: Affordable and widely available.
- Cons: Less focused light output compared to projector headlights.
Consider your budget, desired light output, and aesthetic preferences when choosing the right type of headlight assembly for your 2010 Toyota Tacoma.
9. How To Maintain Your New Headlight Assembly To Prolong Its Life?
Proper maintenance can extend the lifespan and performance of your new headlight assembly:
- Clean the Lens Regularly: Use a soft cloth and mild soap to remove dirt, debris, and grime from the lens.
- Protect from UV Exposure: Apply a UV protectant spray to the lens to prevent yellowing and clouding.
- Inspect for Cracks or Damage: Regularly check the assembly for any signs of cracks or damage.
- Replace Bulbs Promptly: Replace any burnt-out bulbs immediately to maintain optimal light output.
- Avoid Harsh Chemicals: Do not use harsh chemicals or abrasive cleaners on the lens, as they can damage the surface.
By following these maintenance tips, you can keep your headlight assembly in good condition and ensure safe driving for years to come.
10. Frequently Asked Questions (FAQ) About Headlight Replacement
- How often should I replace my headlight assembly?
- You should replace your headlight assembly when it is damaged, cloudy, or no longer provides adequate light output.
- Can I replace just the headlight bulb instead of the entire assembly?
- Yes, if the assembly is in good condition, you can replace just the bulb.
- Are aftermarket headlight assemblies as good as genuine Toyota parts?
- Aftermarket assemblies can be a more affordable option, but genuine Toyota parts from millertoyota.net ensure the best fit and quality.
- Do I need to adjust the headlight alignment after replacing the assembly?
- Yes, it’s recommended to check and adjust the headlight alignment to ensure proper visibility.
- What is the difference between halogen, LED, and HID headlights?
- Halogen headlights are traditional and affordable, LED headlights are energy-efficient and long-lasting, and HID headlights are brighter than halogen.
- Can I upgrade to a different type of headlight assembly?
- Yes, but ensure the new assembly is compatible with your vehicle and meets all safety regulations.
- What tools do I need to replace the headlight assembly?
- You’ll need a socket set, ratchet, screwdrivers, pliers, and gloves.
- How long does it take to replace a headlight assembly?
- It typically takes 30 minutes to 1 hour to replace a headlight assembly.
- Should I disconnect the battery before replacing the headlight assembly?
- It’s optional, but recommended for added safety.
- Where can I buy a replacement headlight assembly?
- You can purchase a replacement headlight assembly from millertoyota.net, local auto parts stores, or online retailers.
Ready to enhance your 2010 Toyota Tacoma’s visibility and appearance? Visit millertoyota.net today to explore our wide selection of genuine Toyota headlight assemblies and experience our exceptional customer service. Whether you prefer to handle the replacement yourself or seek professional assistance, we’re here to support you every step of the way. Contact us at +1 (208) 376-8888 or visit our location at 208 N Maple Grove Rd, Boise, ID 83704, United States. Let millertoyota.net help you find the perfect headlight assembly and keep your Tacoma looking its best!